The Setting section in TAAX Pro allows users to configure and manage the core setup of the Commission Center. This includes connecting a Stripe account to enable payout processing, configuring the branding and domain of the Pay Center, defining the commission structure and hierarchy levels, and managing users within the hierarchy.
Before using the Commission Center features such as Payouts and Commission Reports, it is recommended to complete the settings configuration to ensure that the system is set up correctly.
The following steps explain how to access and use the Setting section in TAAX Pro.
Navigation
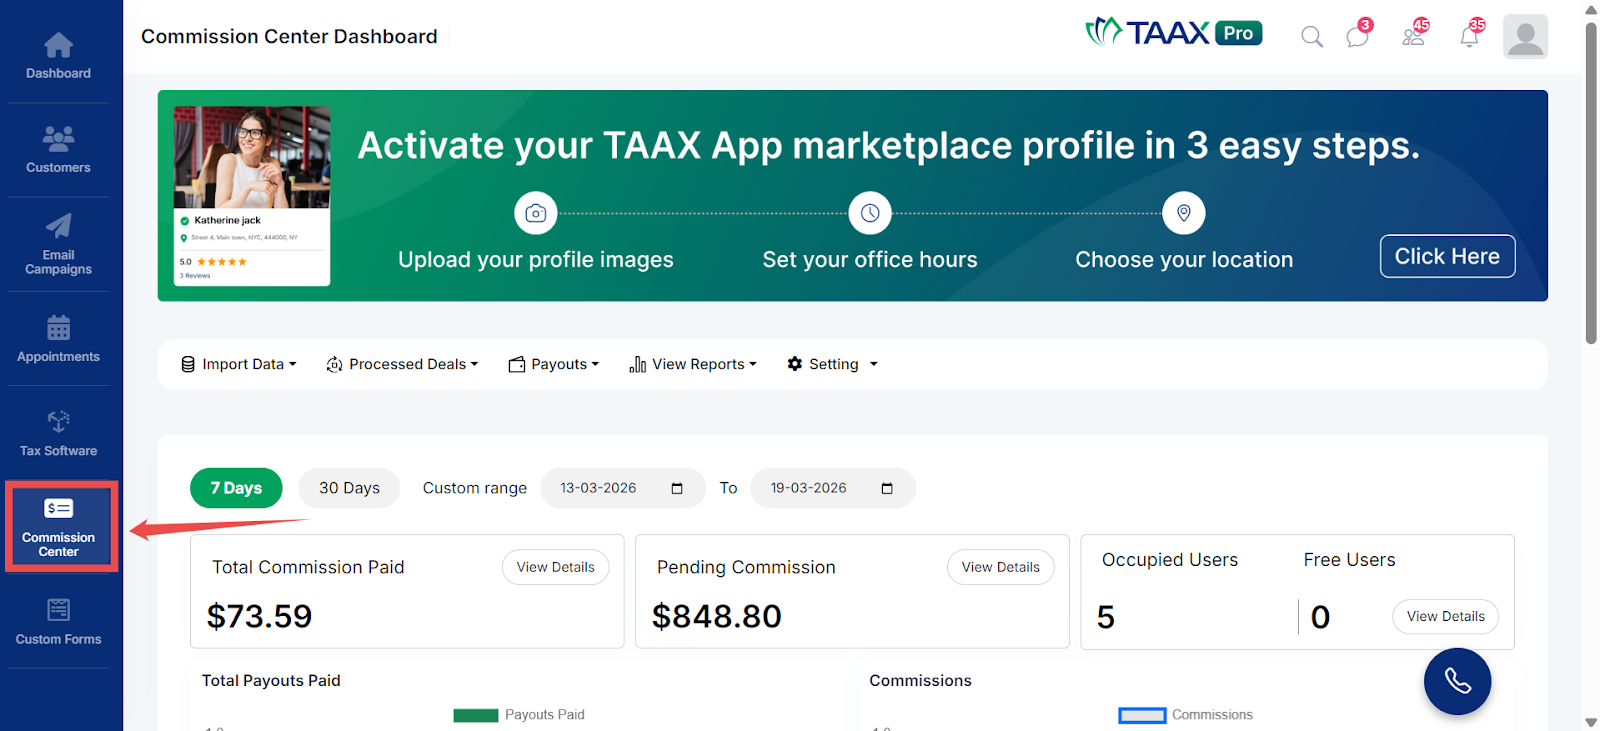
Step 1: From the Dashboard, navigate to the left-side navigation panel and click on Commission Center.
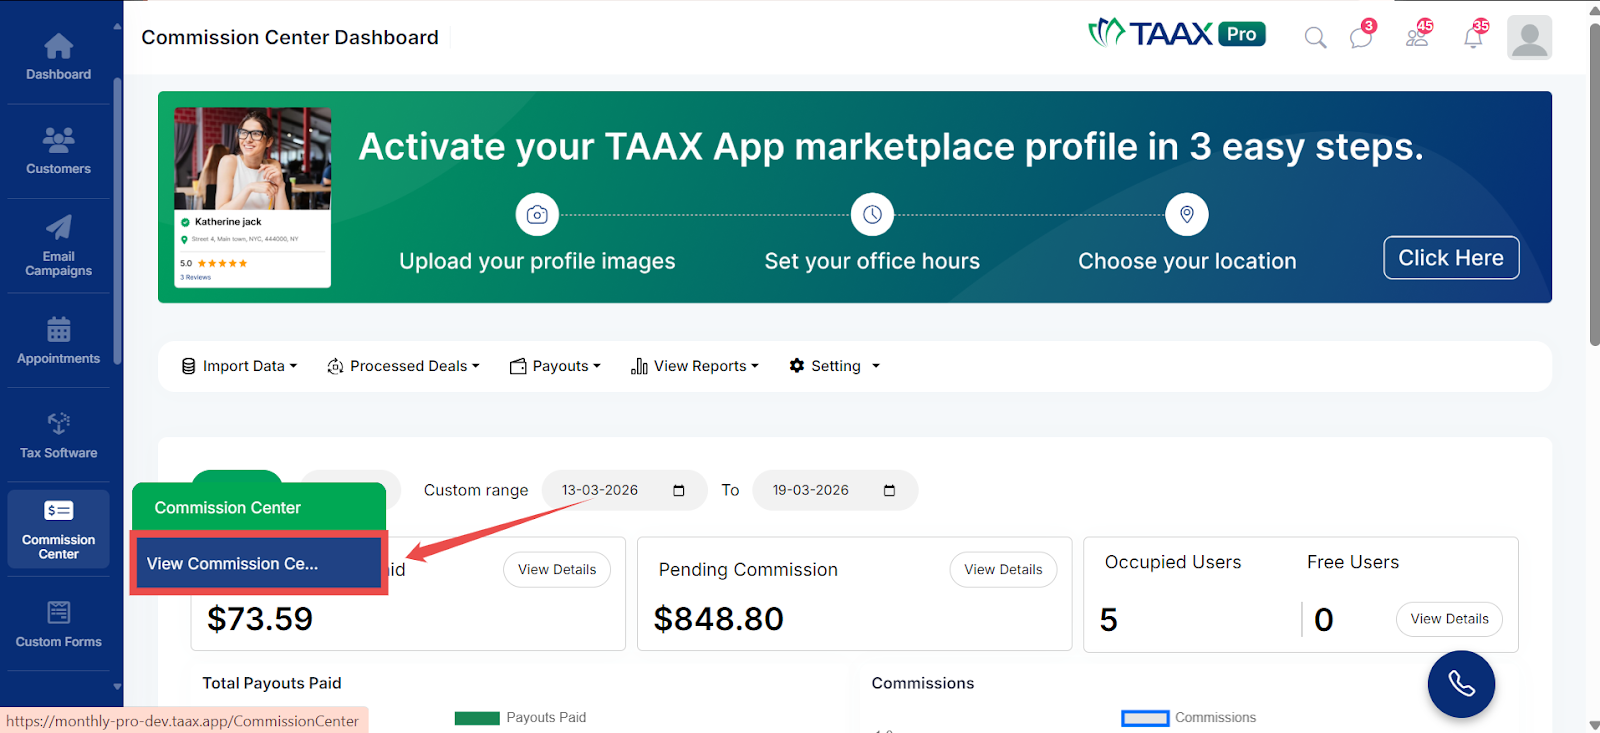
Step 2: Click on View Commission Center. The Commission Center Dashboard will open.
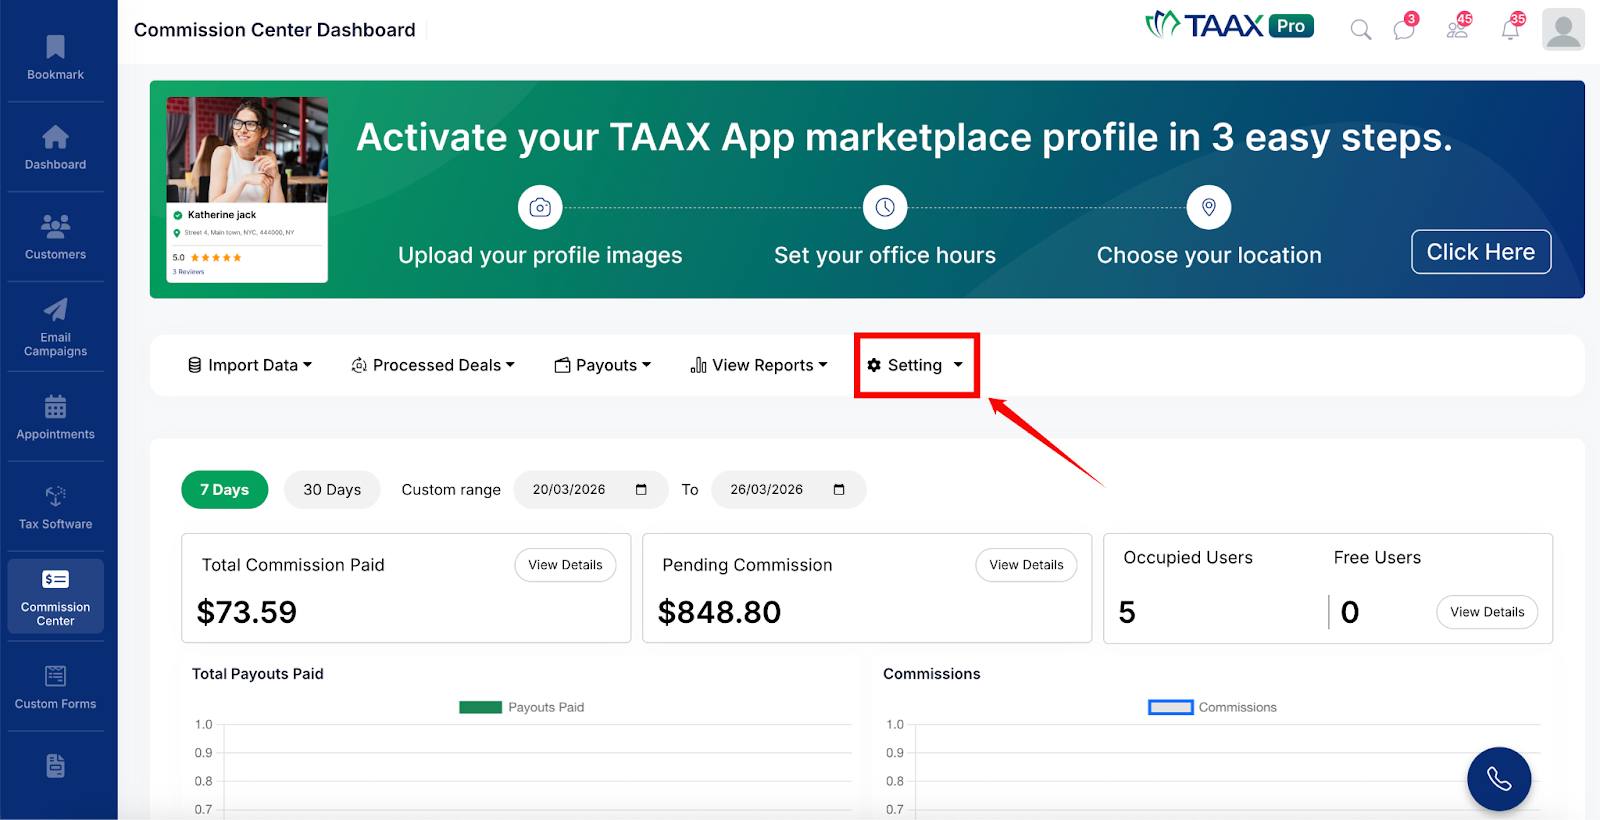
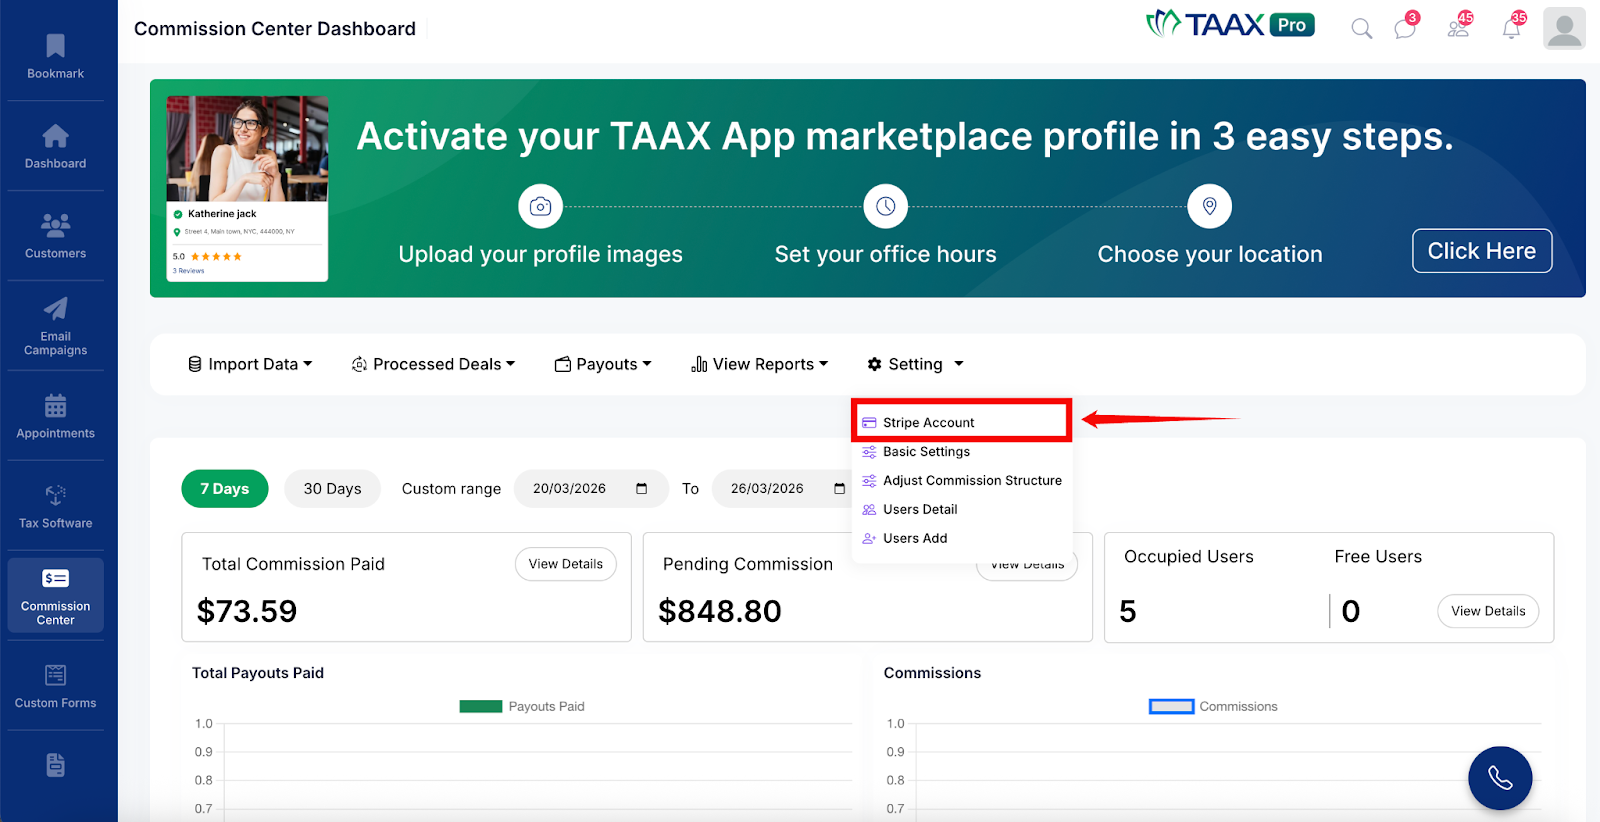
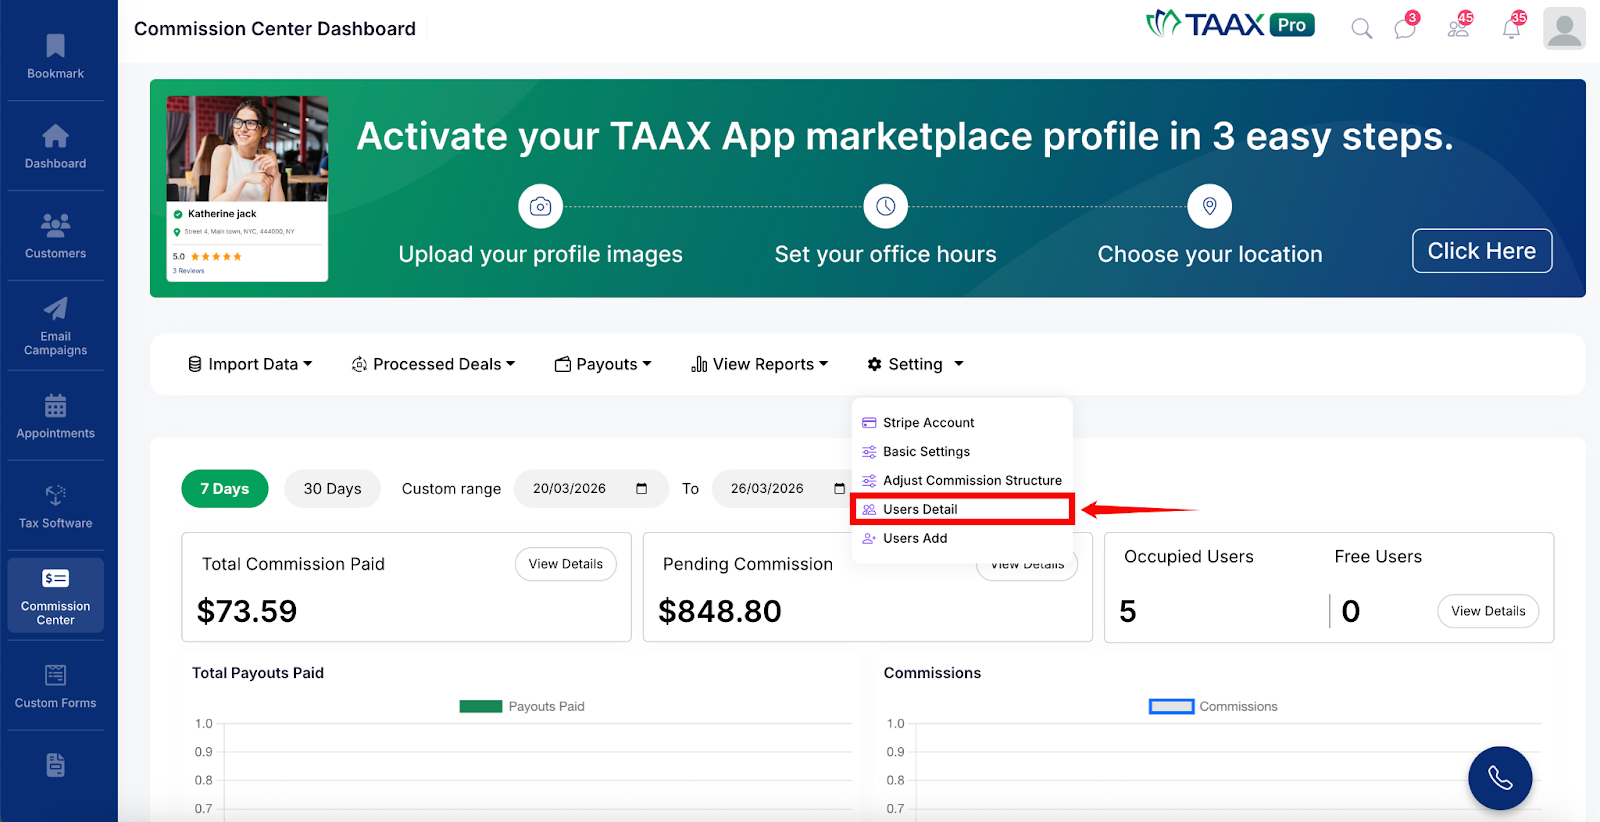
Step 3: On the Commission Center Dashboard, navigate to the top menu and click on Setting.
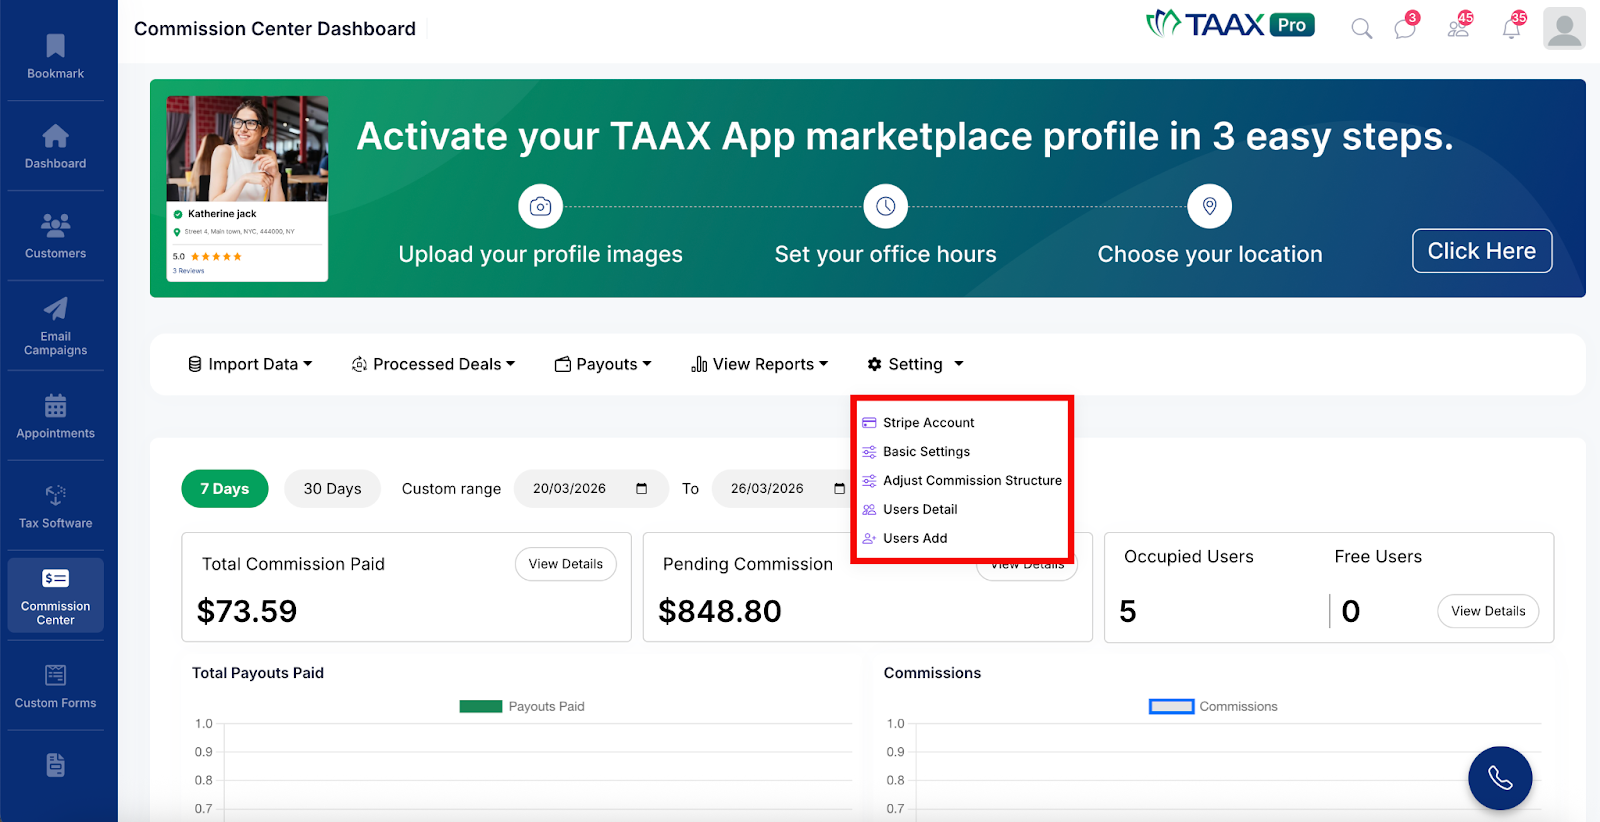
After clicking Setting, the system will display the following options:
- Stripe Account – Connect and manage your Stripe account for processing payouts.
- Basic Settings – Configure the layout, branding, and domain settings for your Pay Center.
- Adjust Commission Structure – Set up and manage the commission hierarchy levels and configuration.
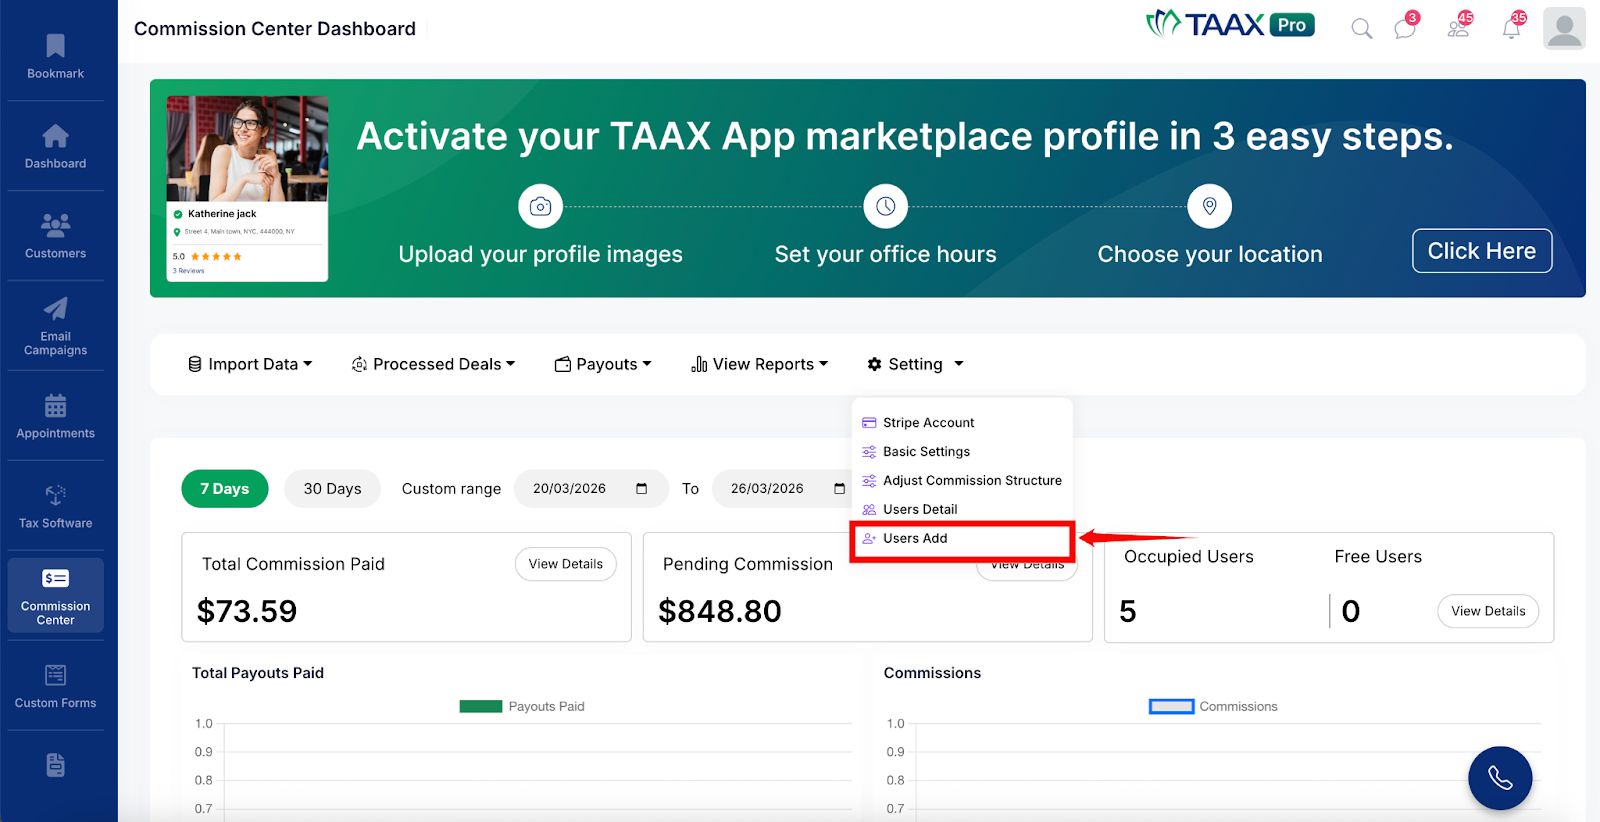
- Users Detail – View and manage all users in the commission hierarchy.
- Users Add – Add new users to the commission hierarchy.
Manage Stripe Account
The Stripe Account section allows users to connect their Stripe account to TAAX Pro. Stripe is a payment processing platform used to transfer commission payouts to users. Once your Stripe account is connected, all payouts generated through the Commission Center will be processed and sent through your Stripe account.
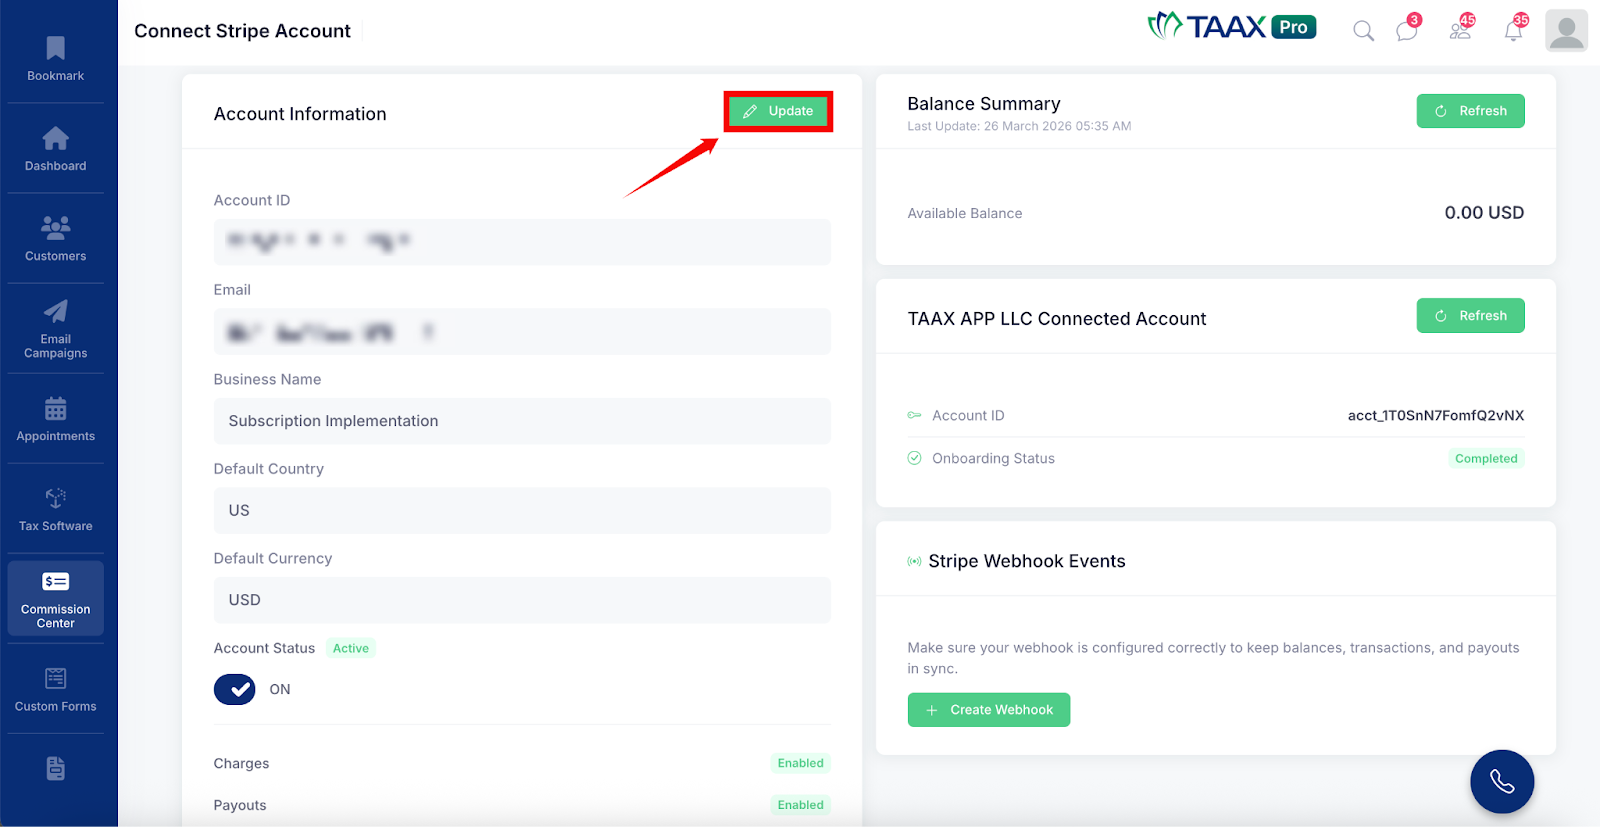
Step 1: Navigate to Setting and click Stripe Account to open the Connect Stripe Account page.
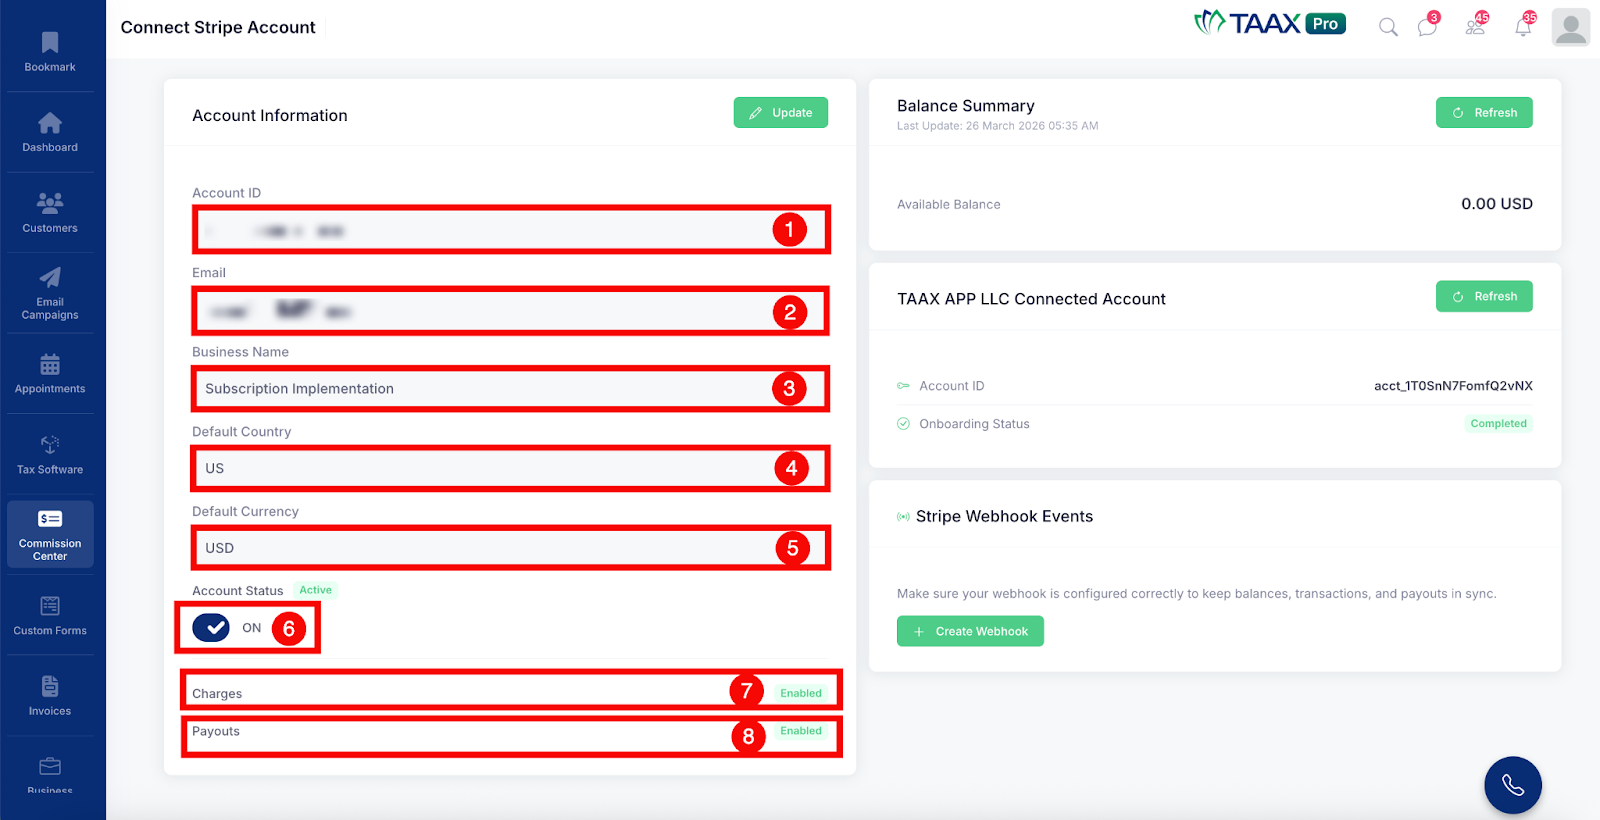
Step 2: When the page opens, the Account Information section will be displayed on the left side of the page, showing the details of your currently connected Stripe account:
| Ref. | Field | Description |
| 1 | Account ID | The unique identifier assigned to your Stripe account. |
| 2 | The email address associated with your Stripe account. | |
| 3 | Business Name | The name of the business linked to your Stripe account. |
| 4 | Default Country | The default country configured for your Stripe account. |
| 5 | Default Currency | The default currency used for processing transactions and payouts. |
| 6 | Account Status | Indicates whether your Stripe account is currently Active or Inactive. |
| 7 | Charges | Shows whether the ability to create charges is enabled or disabled on your account. |
| 8 | Payouts | Shows whether payouts are enabled or disabled on your account. |
Step 3: On the right side of the page, review the Balance Summary section. This section displays the current available balance in your Stripe account along with the date and time of the last update.
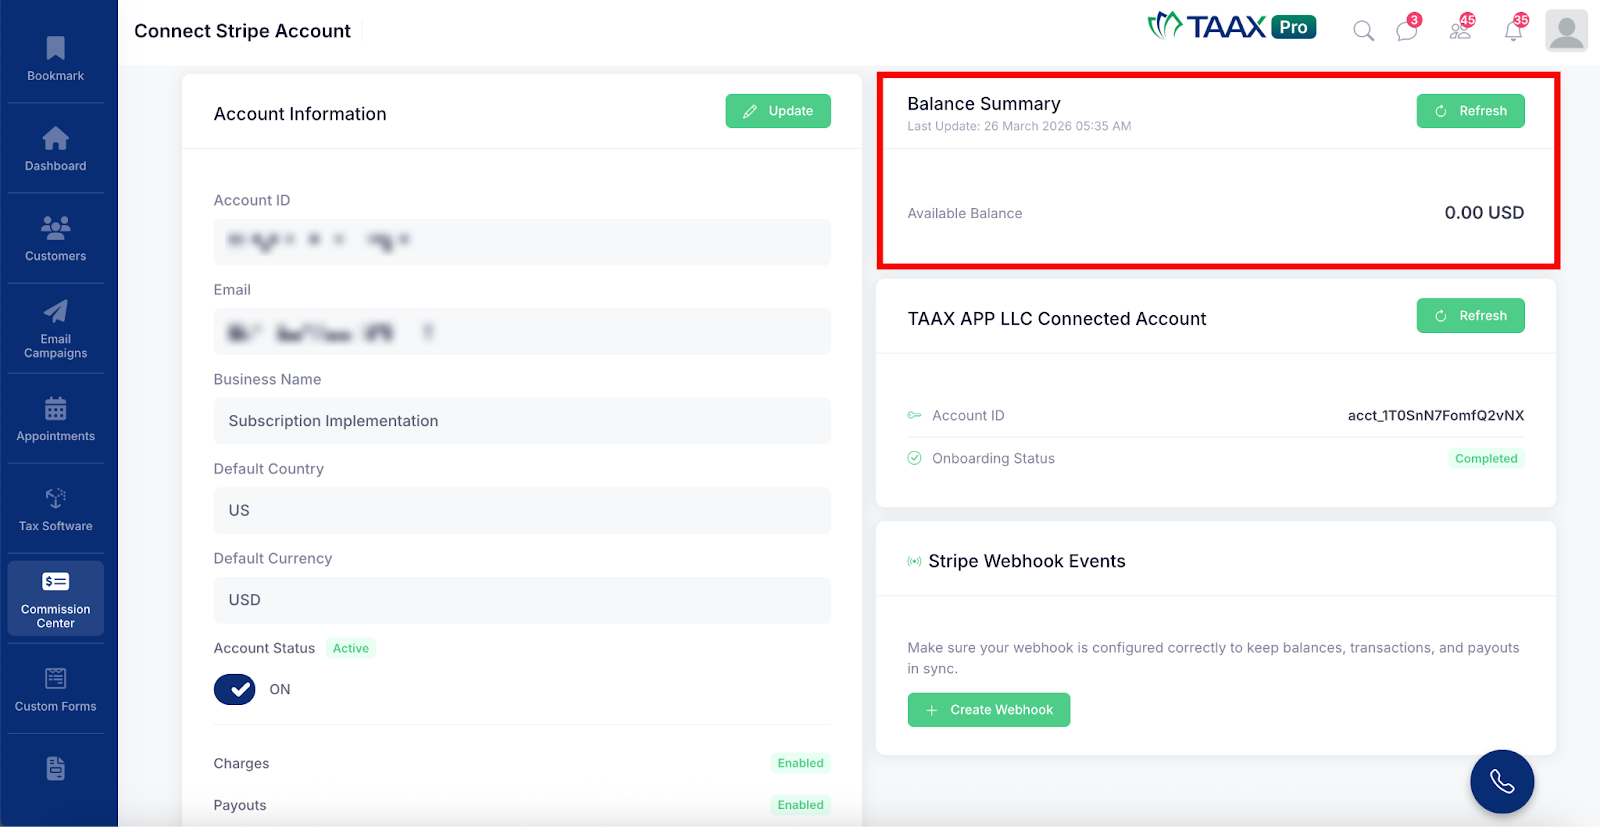
Step 4: Click the Refresh button to fetch the latest balance information from Stripe.
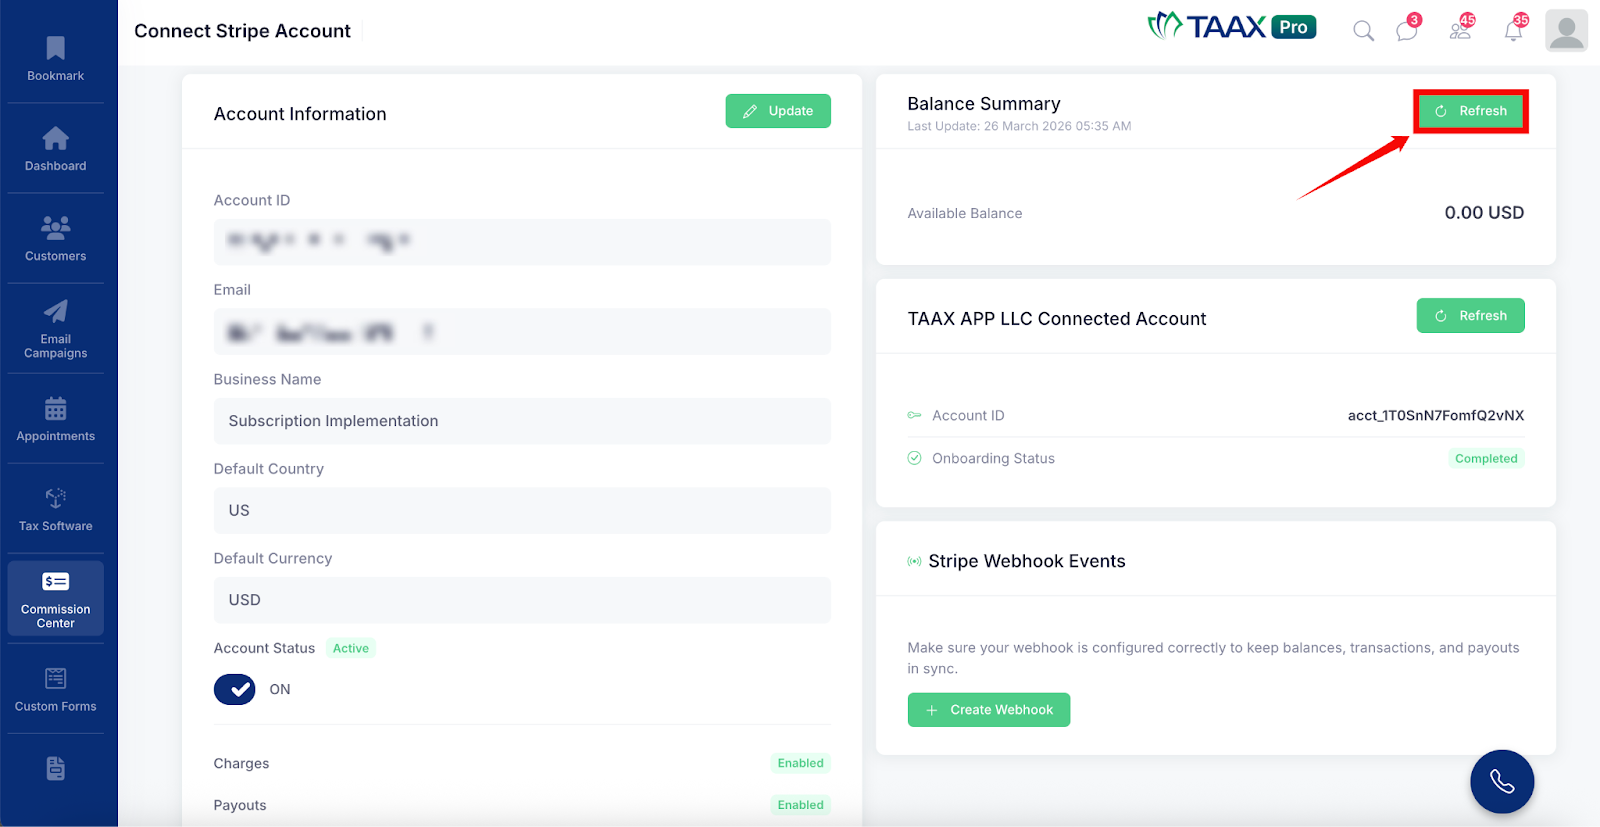
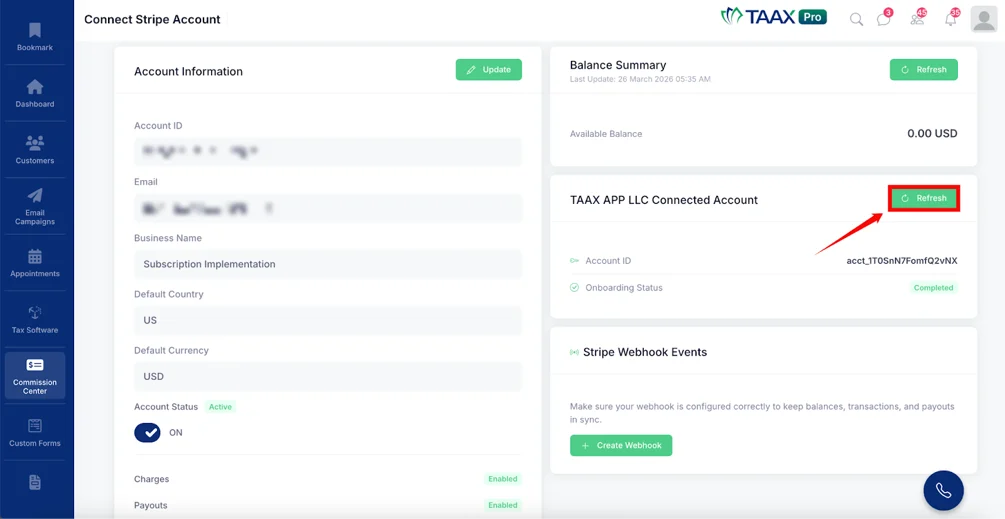
Step 5: Below the Balance Summary, review the TAAX APP LLC Connected Account section. This section displays the Account ID and Onboarding Status of the platform account connected to TAAX Pro.
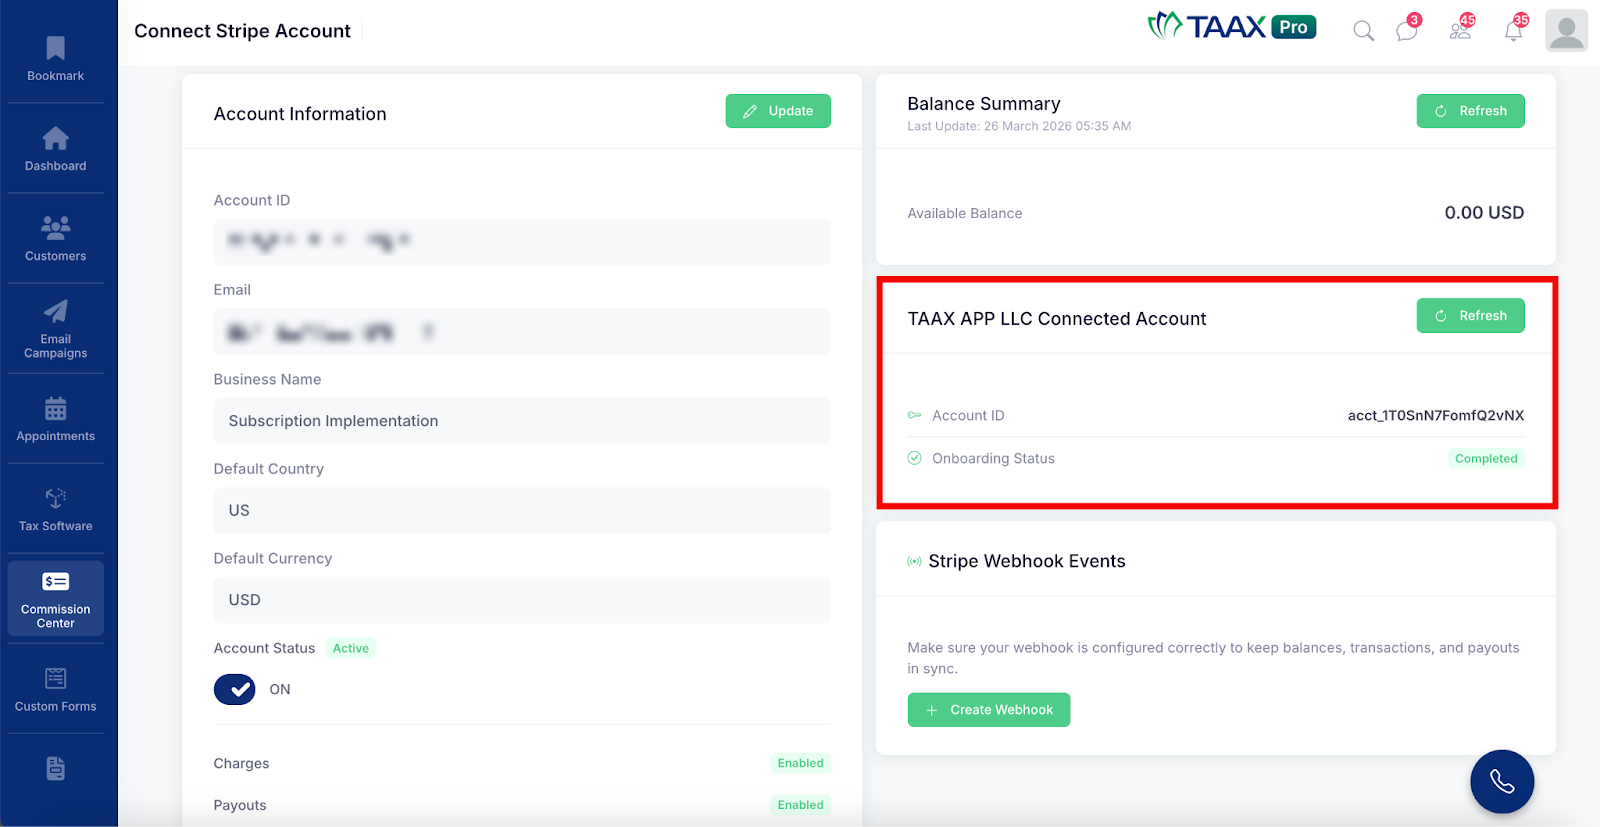
The Onboarding Status will show as Completed once the account has been successfully onboarded.
Step 6: Click the Refresh button to update the connected account information.
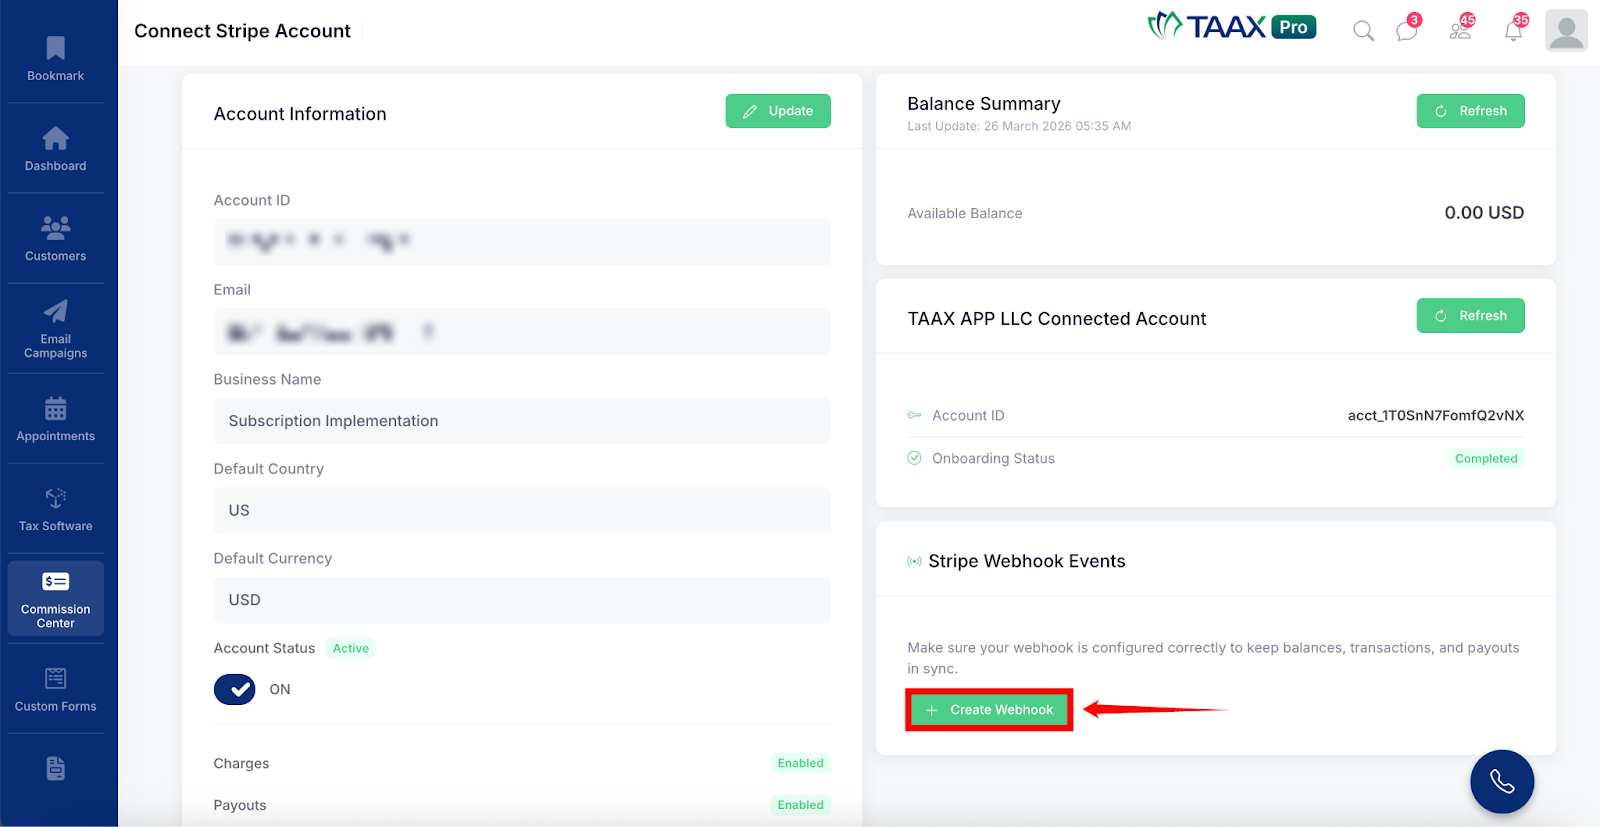
Step 5: At the bottom right of the page, review the Stripe Webhook Events section. Webhooks ensure that your Stripe account stays in sync with TAAX Pro so that balances, transactions, and payouts are always up to date.
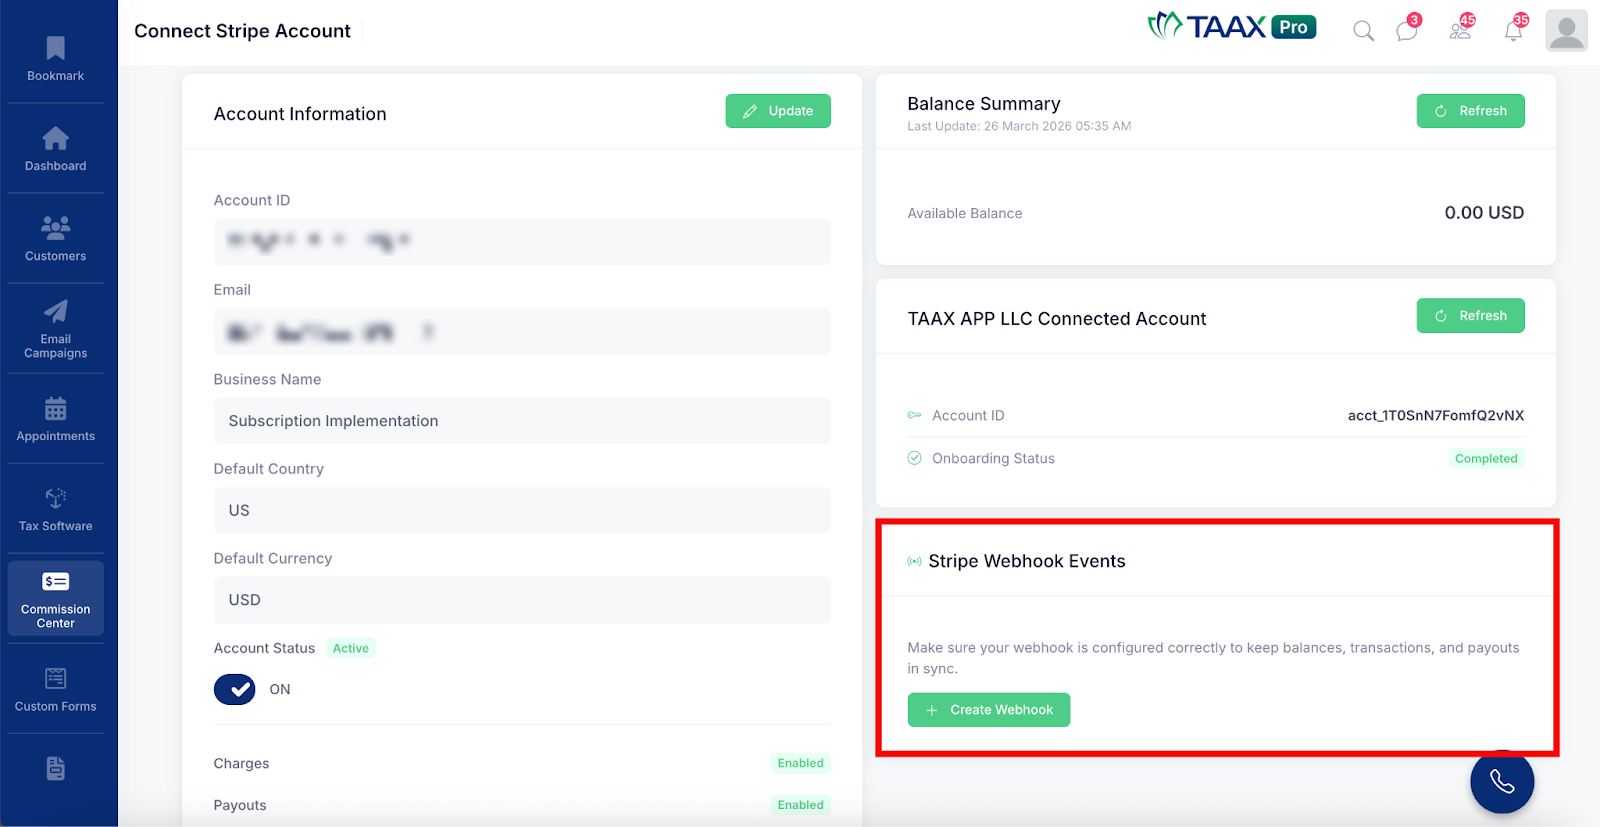
If a webhook has not been created yet, click the Create Webhook button to set it up.
Updating Your Stripe Account
If you need to update or change the connected Stripe account, follow the steps below:
Step 1: On the Connect Stripe Account page, click the Update button at the top right of the Account Information section.
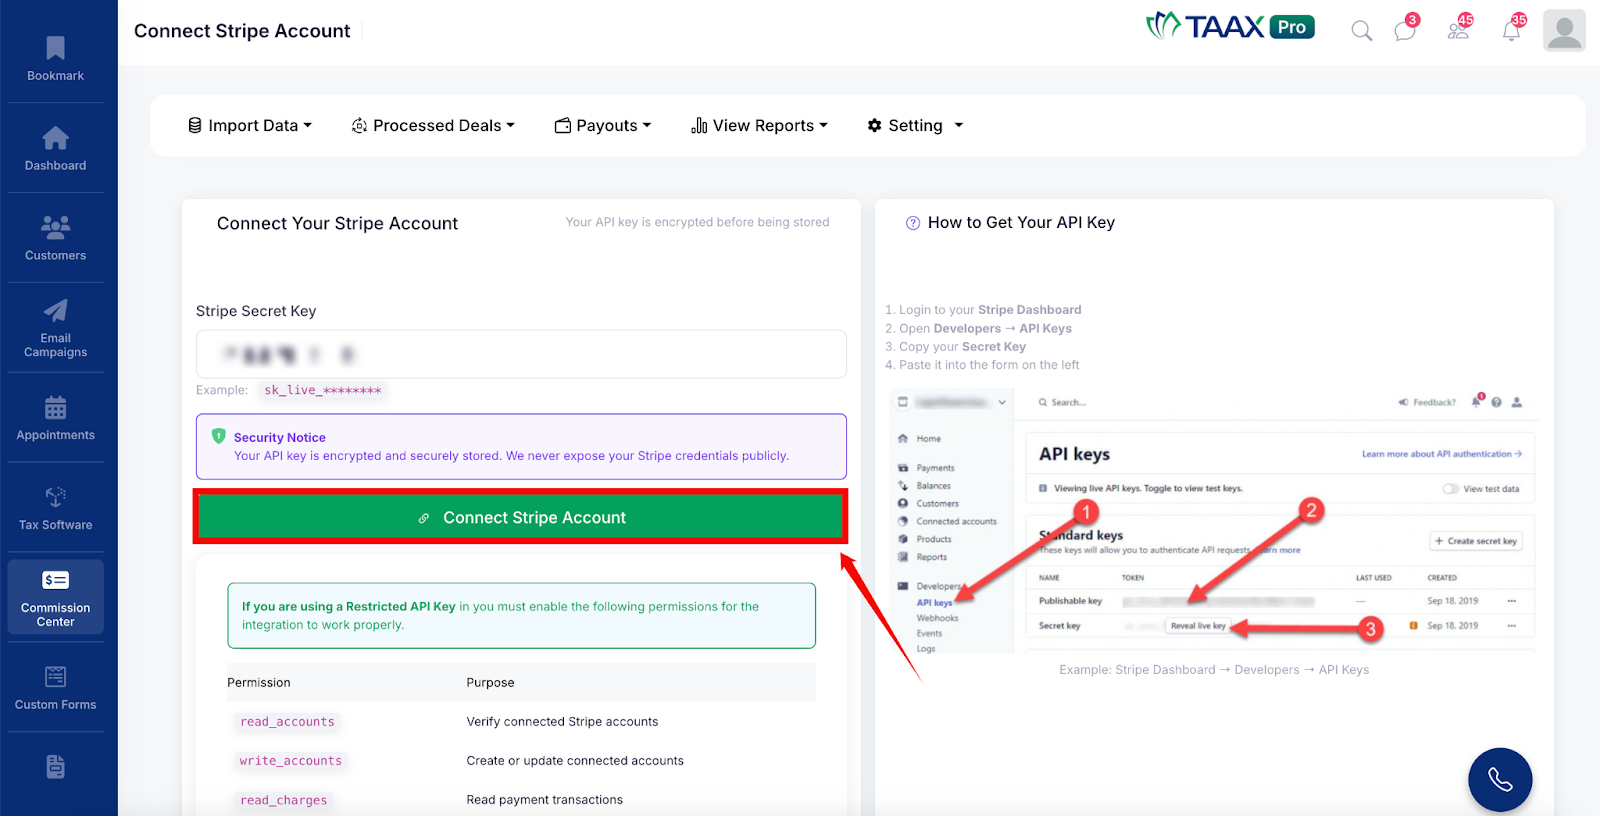
Step 2: The Connect Your Stripe Account form will open. In the Stripe Secret Key field, enter your new Stripe Secret Key.
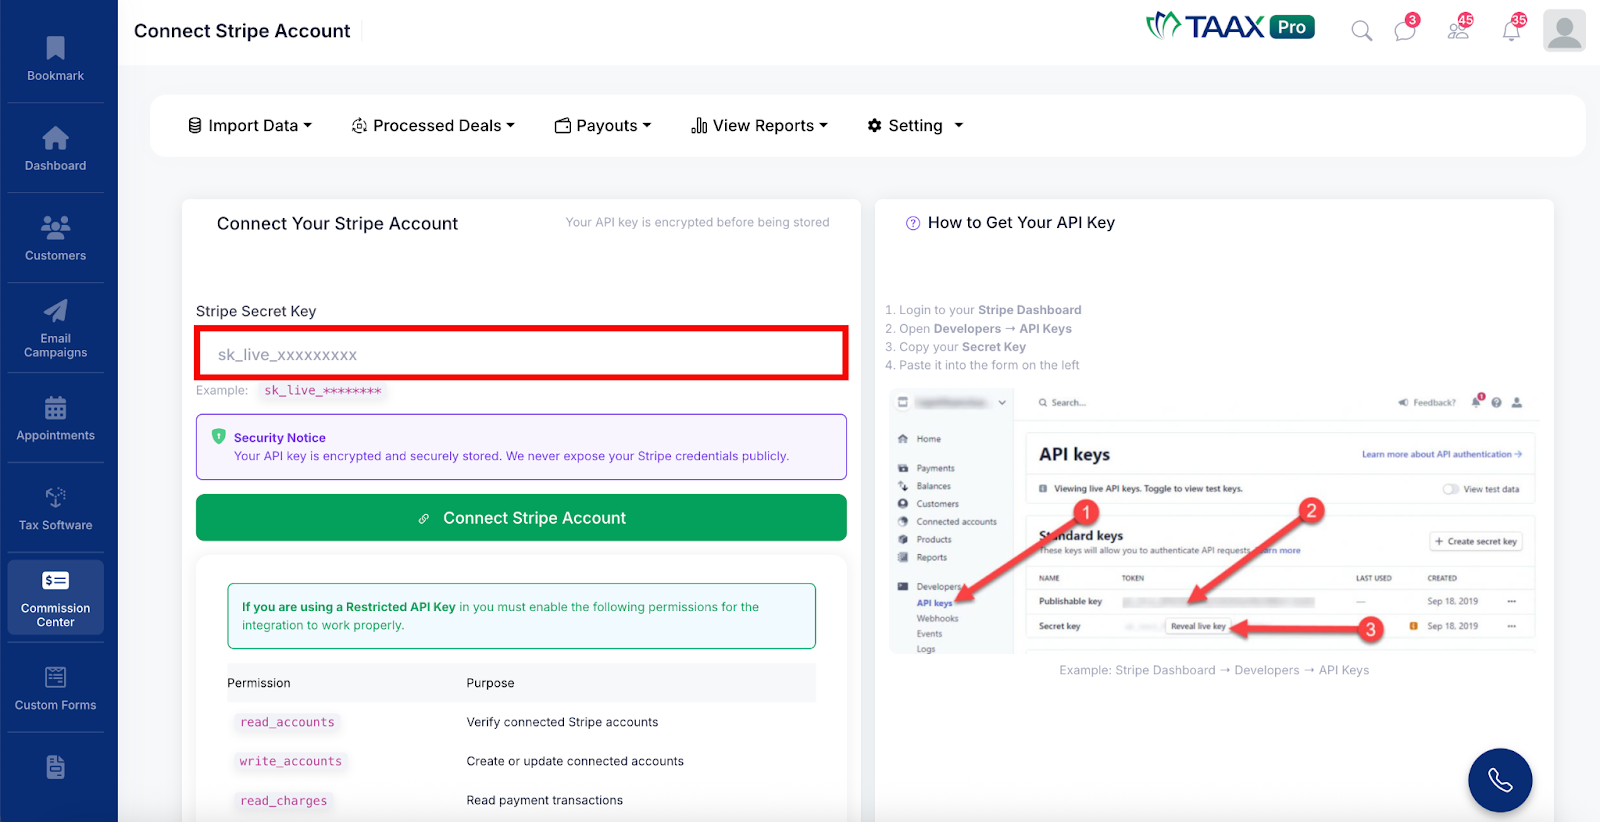
Note: Your API key is encrypted and securely stored by TAAX Pro. Your Stripe credentials are never exposed publicly.
Step 3: Click the Connect Stripe Account button to save the new key.
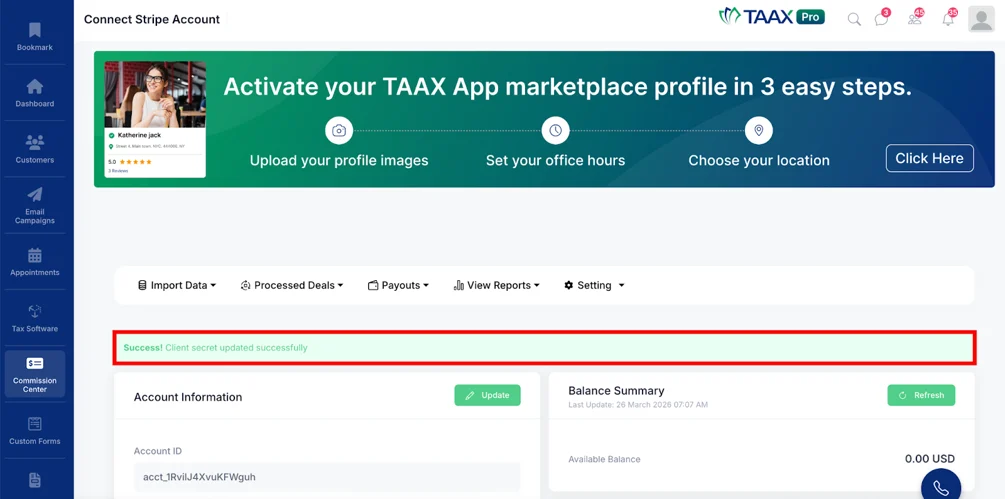
A success message will appear confirming that the client secret has been updated successfully and the page will return to the Account Information view.
Configure Basic Settings
The Basic Settings section allows users to configure the layout and branding of their Pay Center. This includes setting up the subdomain, choosing theme colors, and uploading a logo and favicon. These settings help customize the appearance of your Pay Center to match your business identity.
Step 1: Navigate to Setting and click Basic Settings to open the Theme Settings page.

Step 2: In the Domain Settings section, review the Unique Name (Subdomain) field. This is the subdomain that has been configured for your Pay Center and is shown with an Active status once it has been set up.
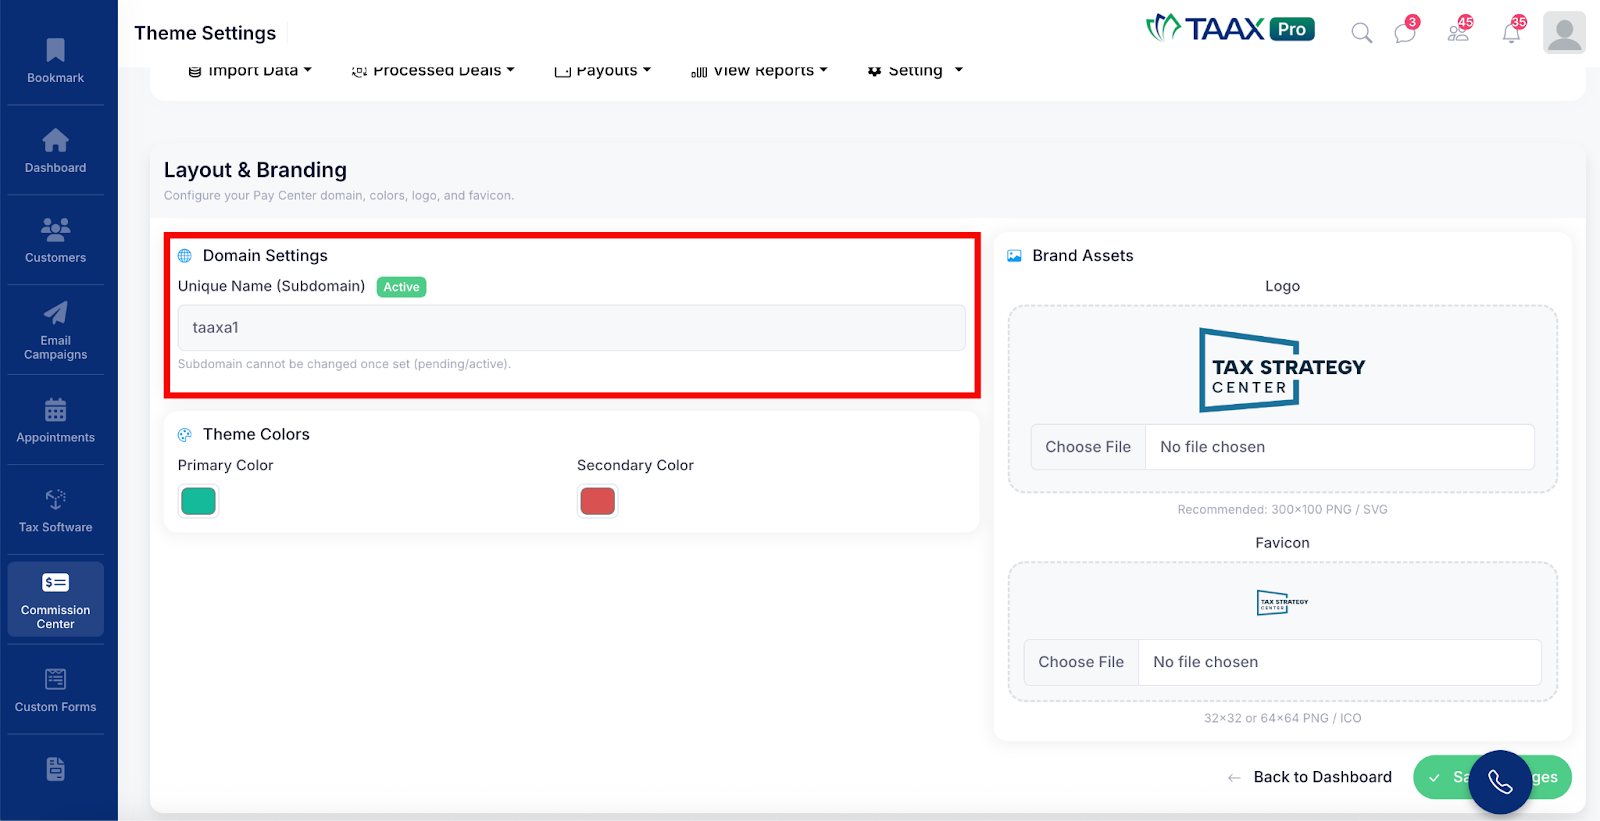
Note: The subdomain cannot be changed once it has been set to pending or active status.
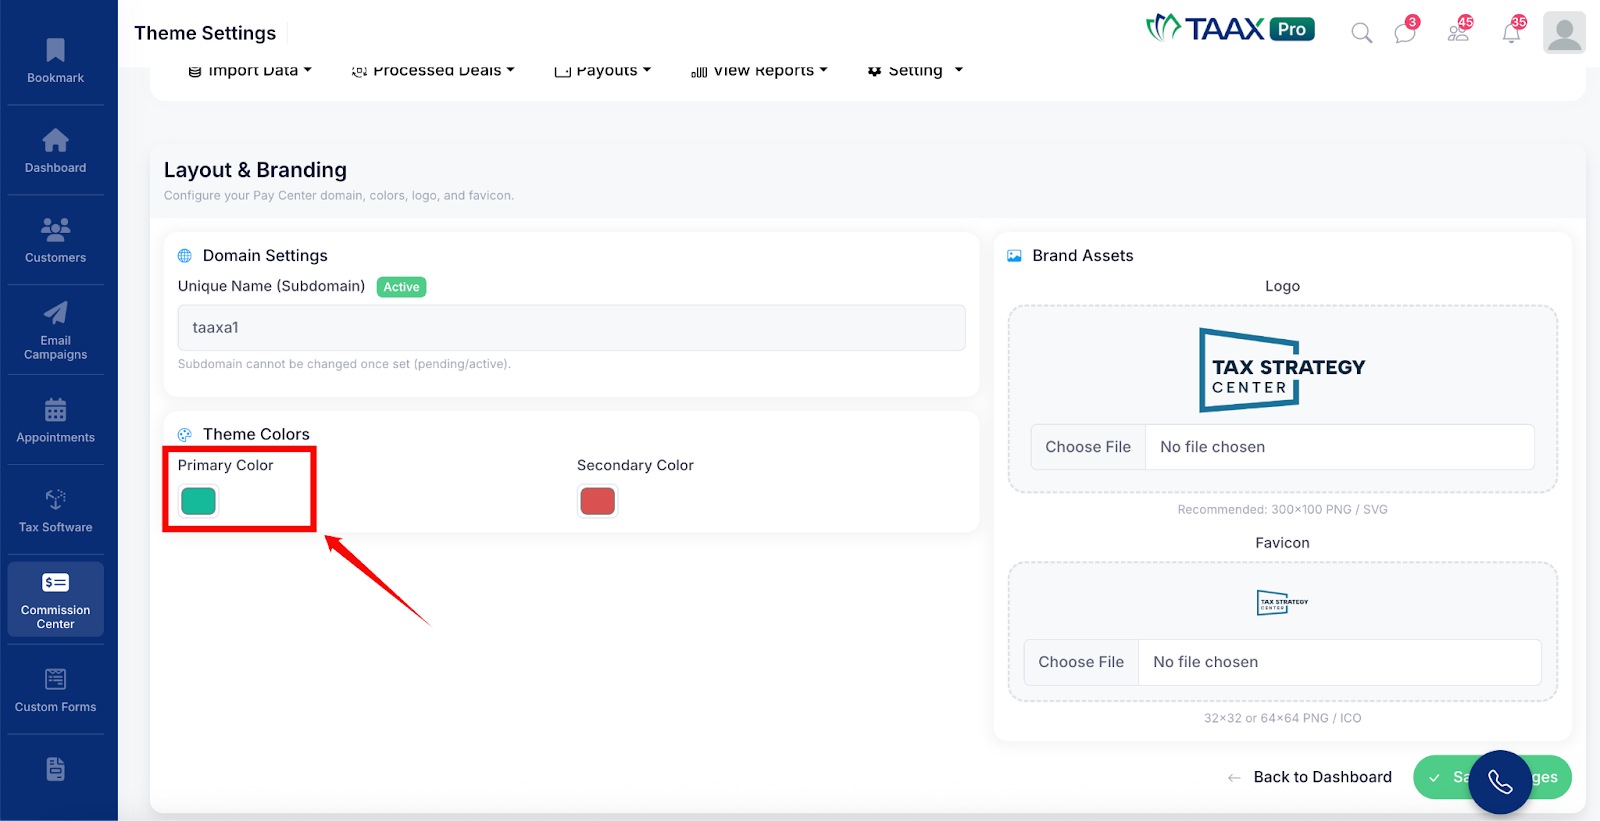
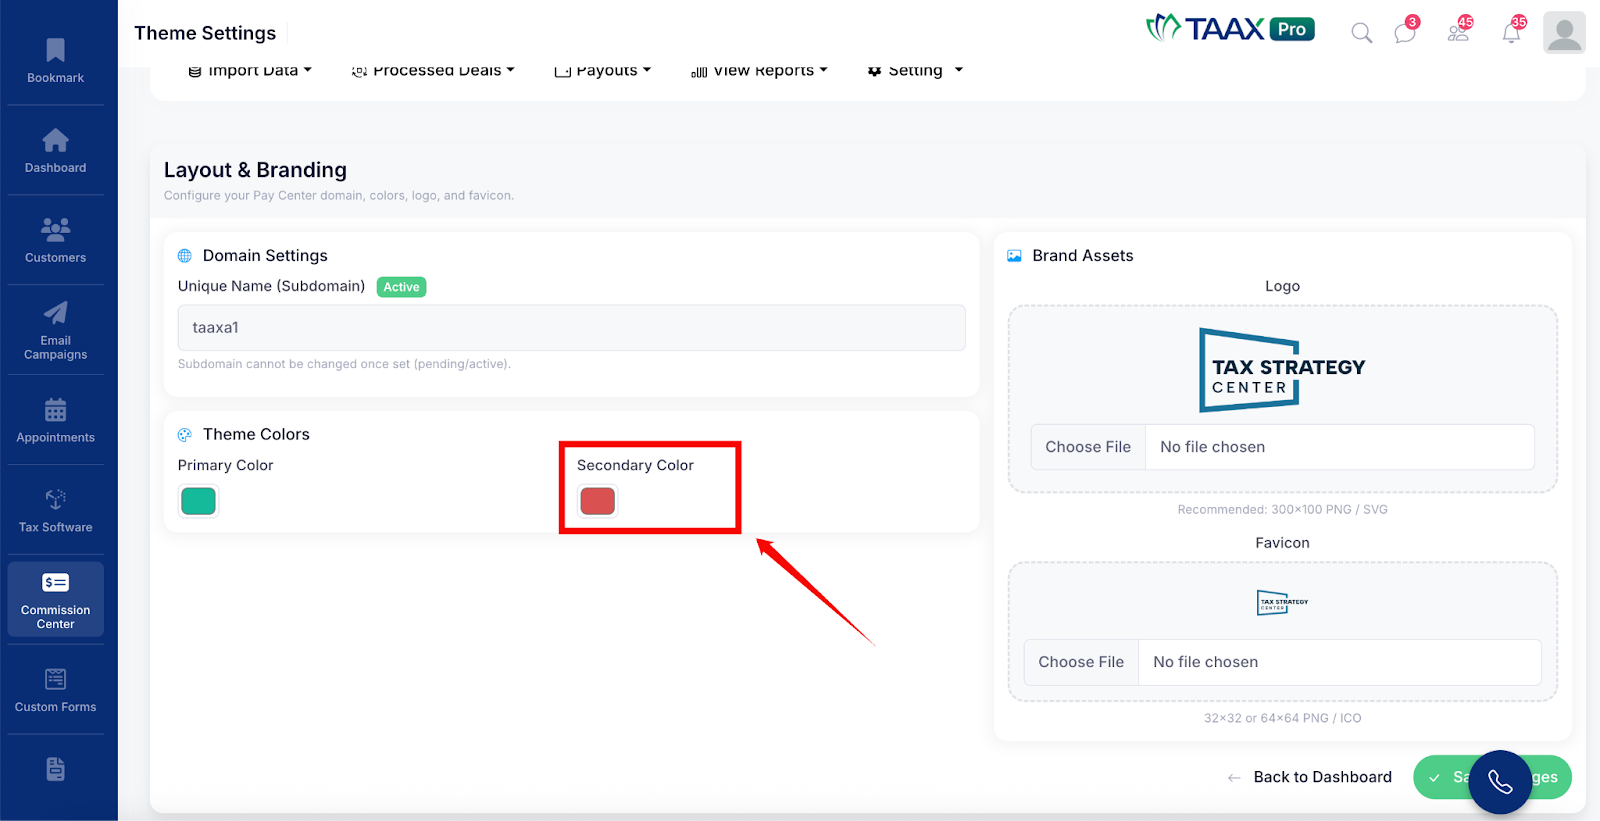
Step 3: In the Theme Colors section, configure the colors that will be used across your Pay Center:
- Primary Color – This is the main color used for buttons, headers, and key elements of your Pay Center. Click the color box to select your preferred primary color.
- Secondary Color – This is the supporting color used for accents and secondary elements. Click the color box to select your preferred secondary color.
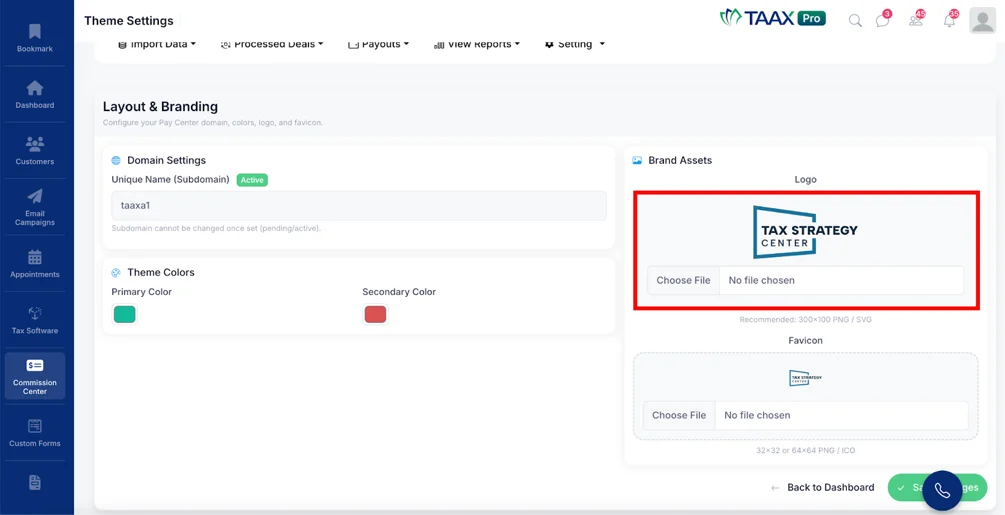
Step 4: In the Brand Assets section, upload the visual assets for your Pay Center:
- Logo – Click Choose File to upload your business logo. The recommended size is 300×100 pixels in PNG or SVG format. This logo will be displayed on your Pay Center pages.
- Favicon – Click Choose File to upload your favicon. The favicon is the small icon that appears in the browser tab when users visit your Pay Center. The recommended size is 32×32 or 64×64 pixels in PNG or ICO format.
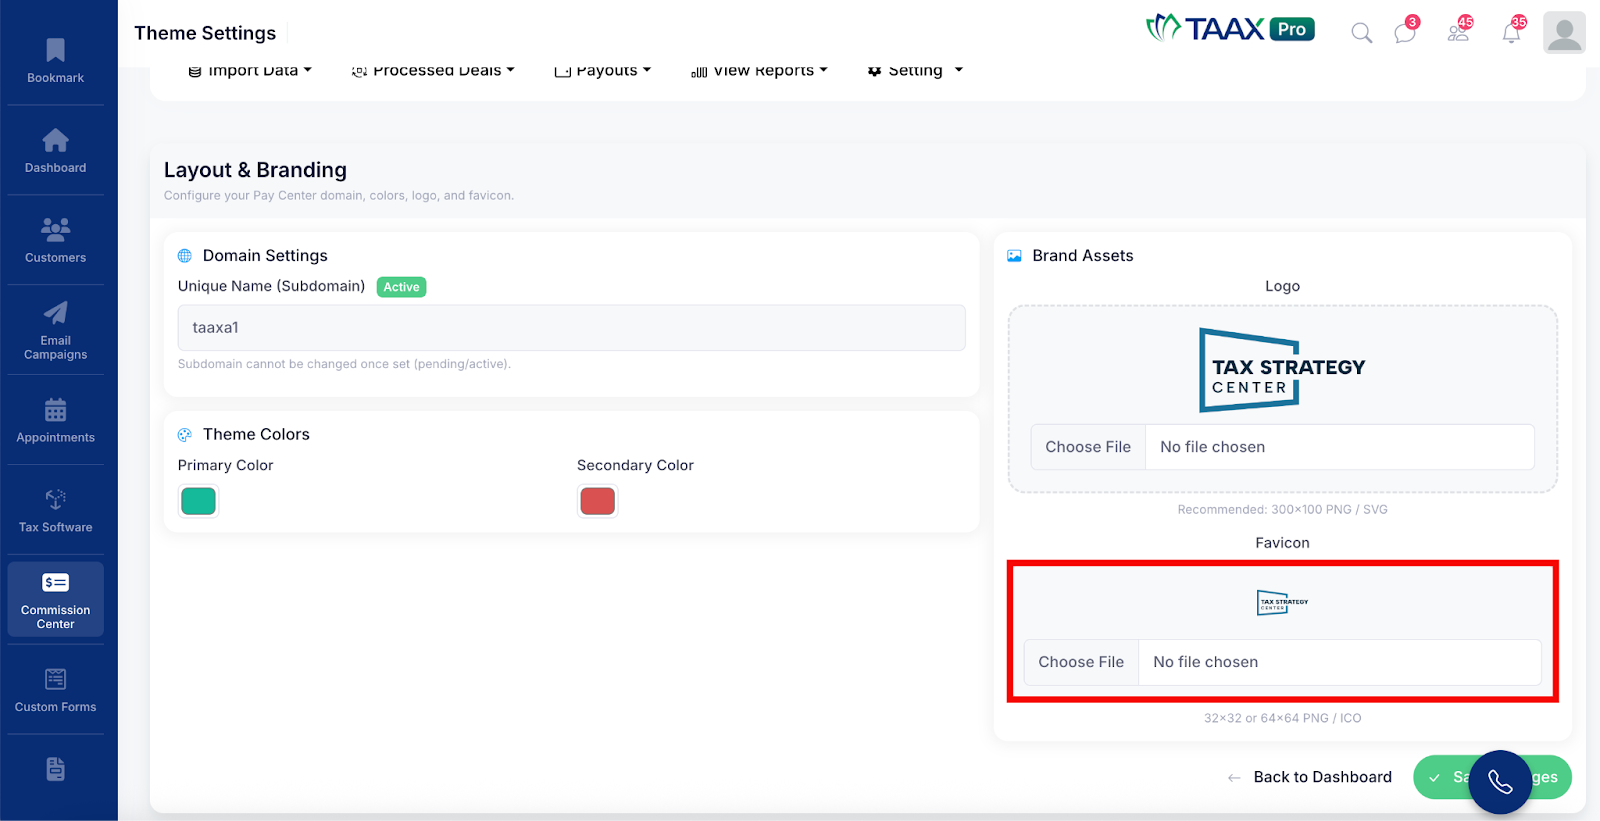
Step 5: Once all the settings have been configured, click the Save Changes button to apply and save the updated branding settings.
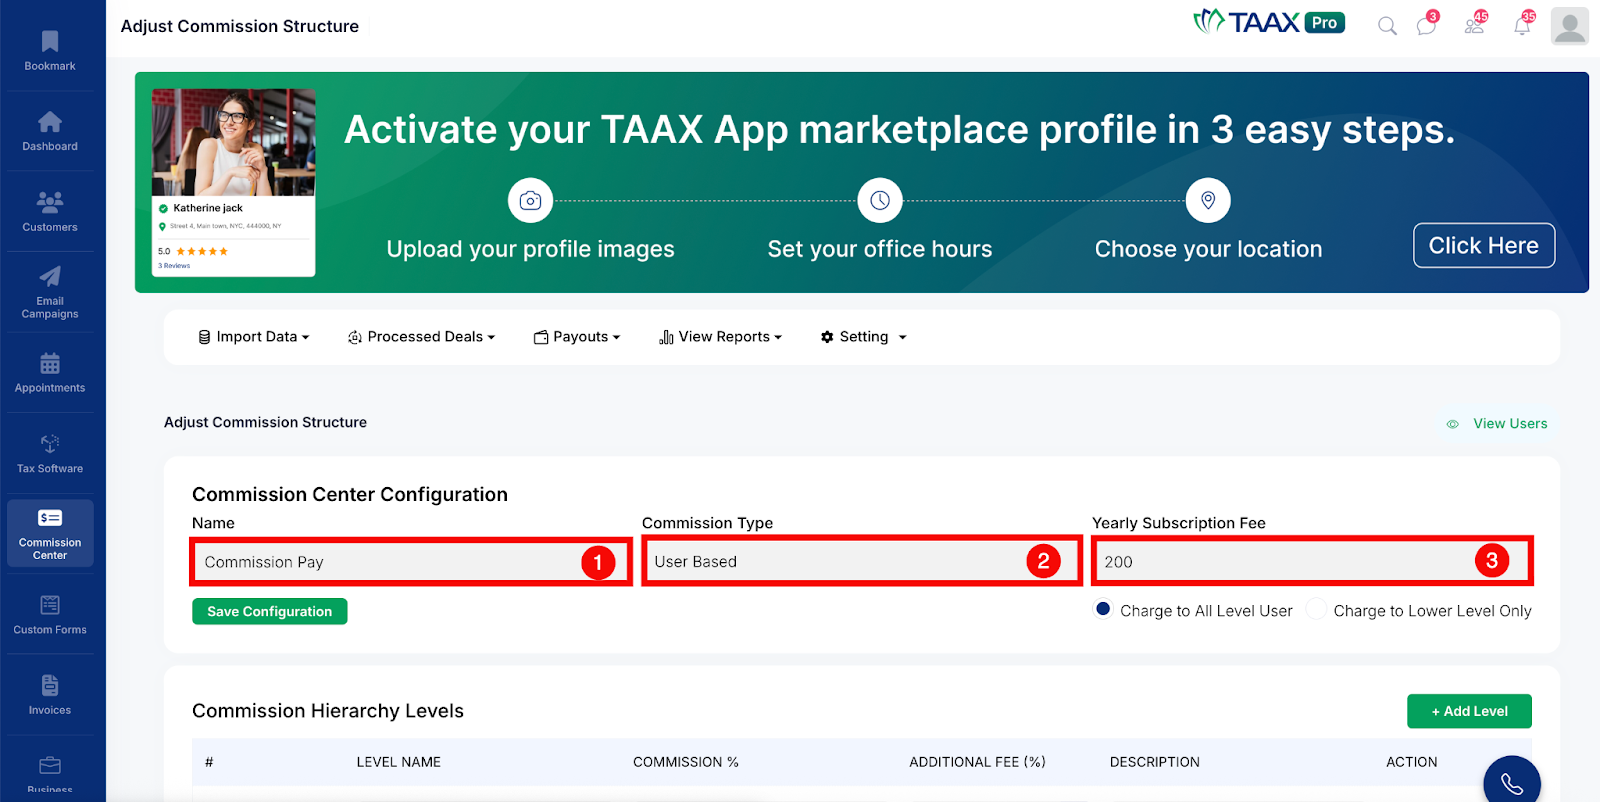
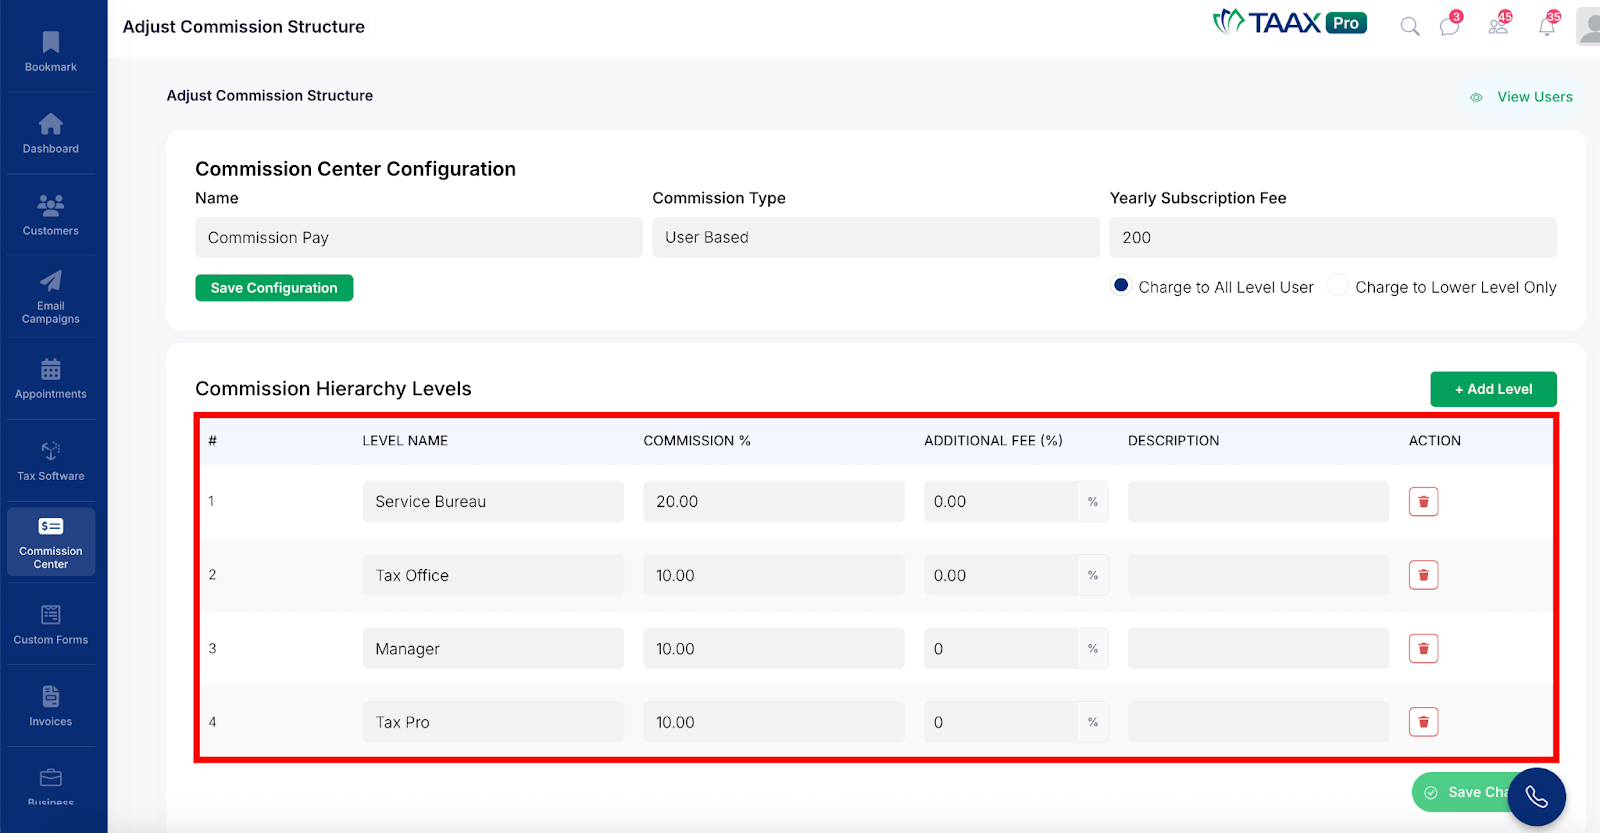
Adjust Commission Structure
The Adjust Commission Structure section allows users to define how commissions are calculated and distributed across the hierarchy. This includes setting up the commission configuration and defining the hierarchy levels with their respective commission percentages.
Step 1: Navigate to Setting and click Adjust Commission Structure to open the configuration page.

Step 2: In the Commission Center Configuration section, review or update the following details:
- Name – The name of the commission configuration used to identify it within the system.
- Commission Type – The method used to calculate commissions. For example, User Based means commissions are calculated based on individual user activity.
- Yearly Subscription Fee – The annual subscription fee that will be charged to users as part of the commission structure.
Step 3: Select how the yearly subscription fee should be applied:
- Charge to All Level User – The subscription fee will be charged to all users across every level in the hierarchy.
- Charge to Lower Level Only – The subscription fee will only be charged to users at lower levels in the hierarchy.
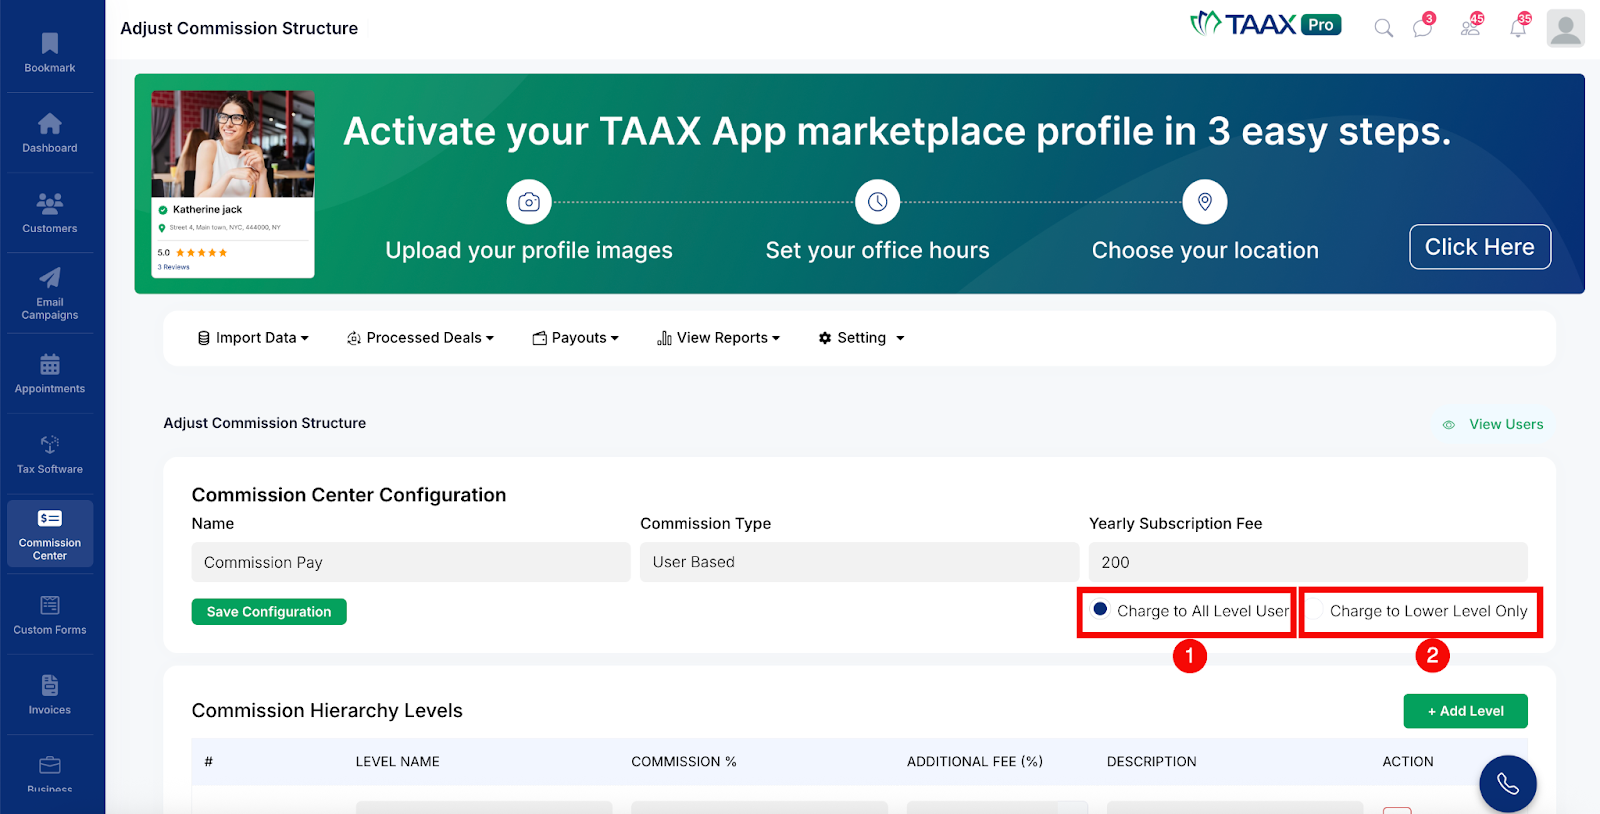
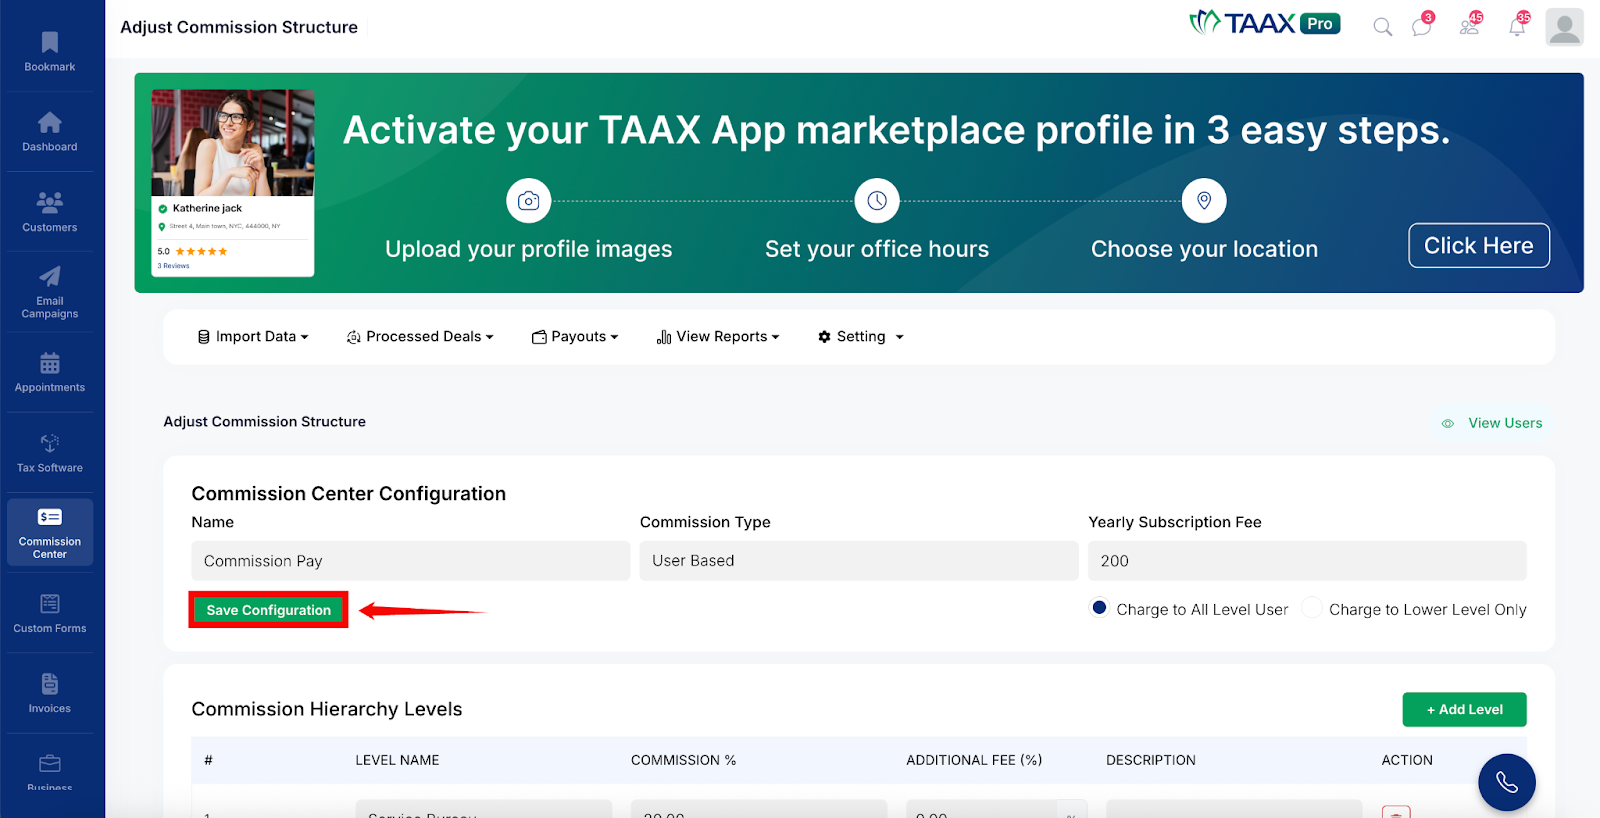
Step 4: Click the Save Configuration button to save the commission configuration settings.
Step 5: In the Commission Hierarchy Levels section, review the existing hierarchy levels displayed in the table. Each level shows the following information:
- Level Name – The name of the hierarchy level (e.g., Service Bureau, Tax Office, Manager, Tax Pro).
- Commission % – The commission percentage assigned to users at this level.
- Additional Fee (%) – Any additional fee percentage applied at this level.
- Description – An optional description for the hierarchy level.
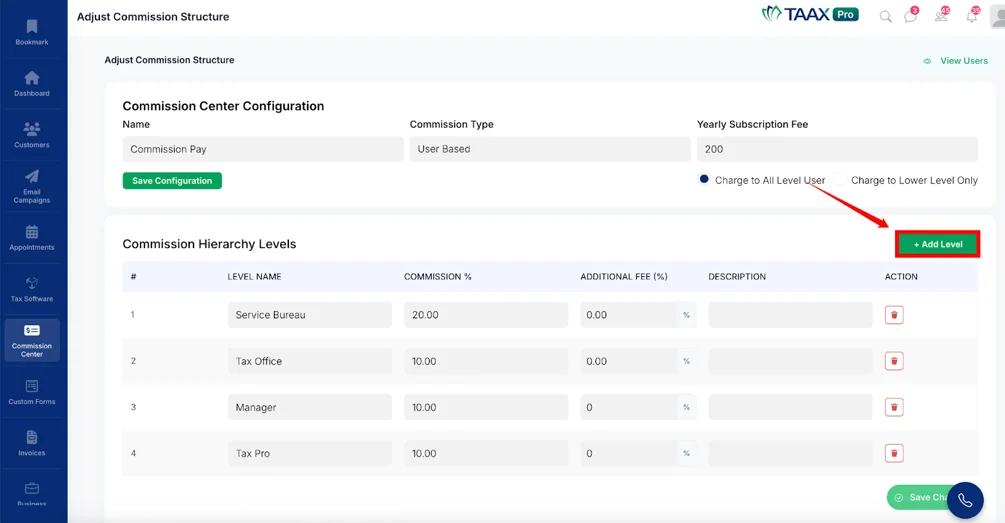
Step 6: To add a new hierarchy level, click the + Add Level button. A new row will appear in the table where you can enter the level name, commission percentage, additional fee, and description for the new level.
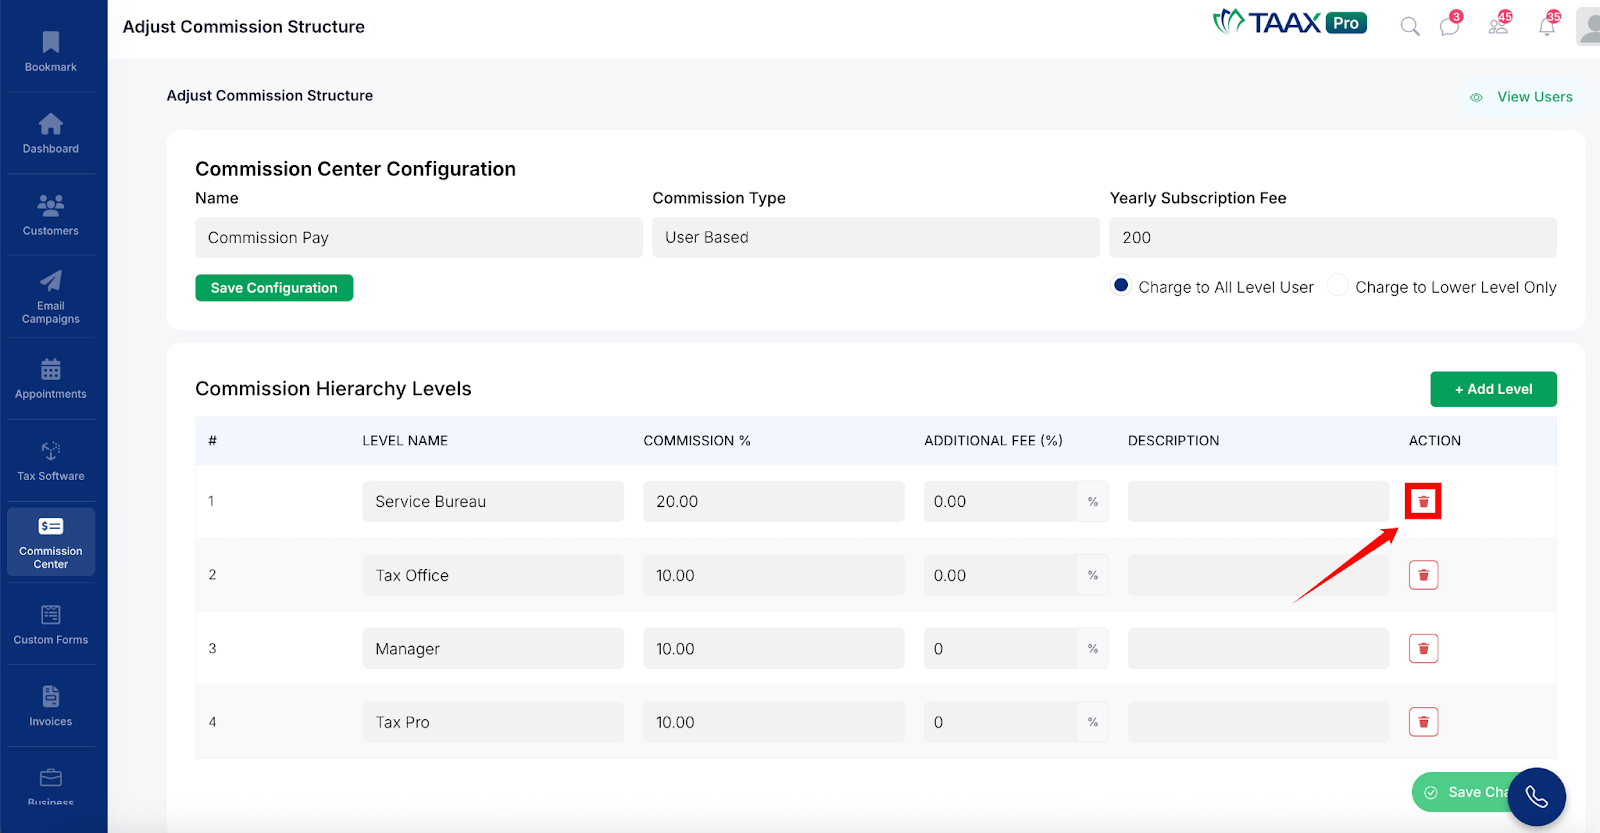
Step 7: To remove an existing hierarchy level, click the Delete icon in the Action column next to the level you want to remove.
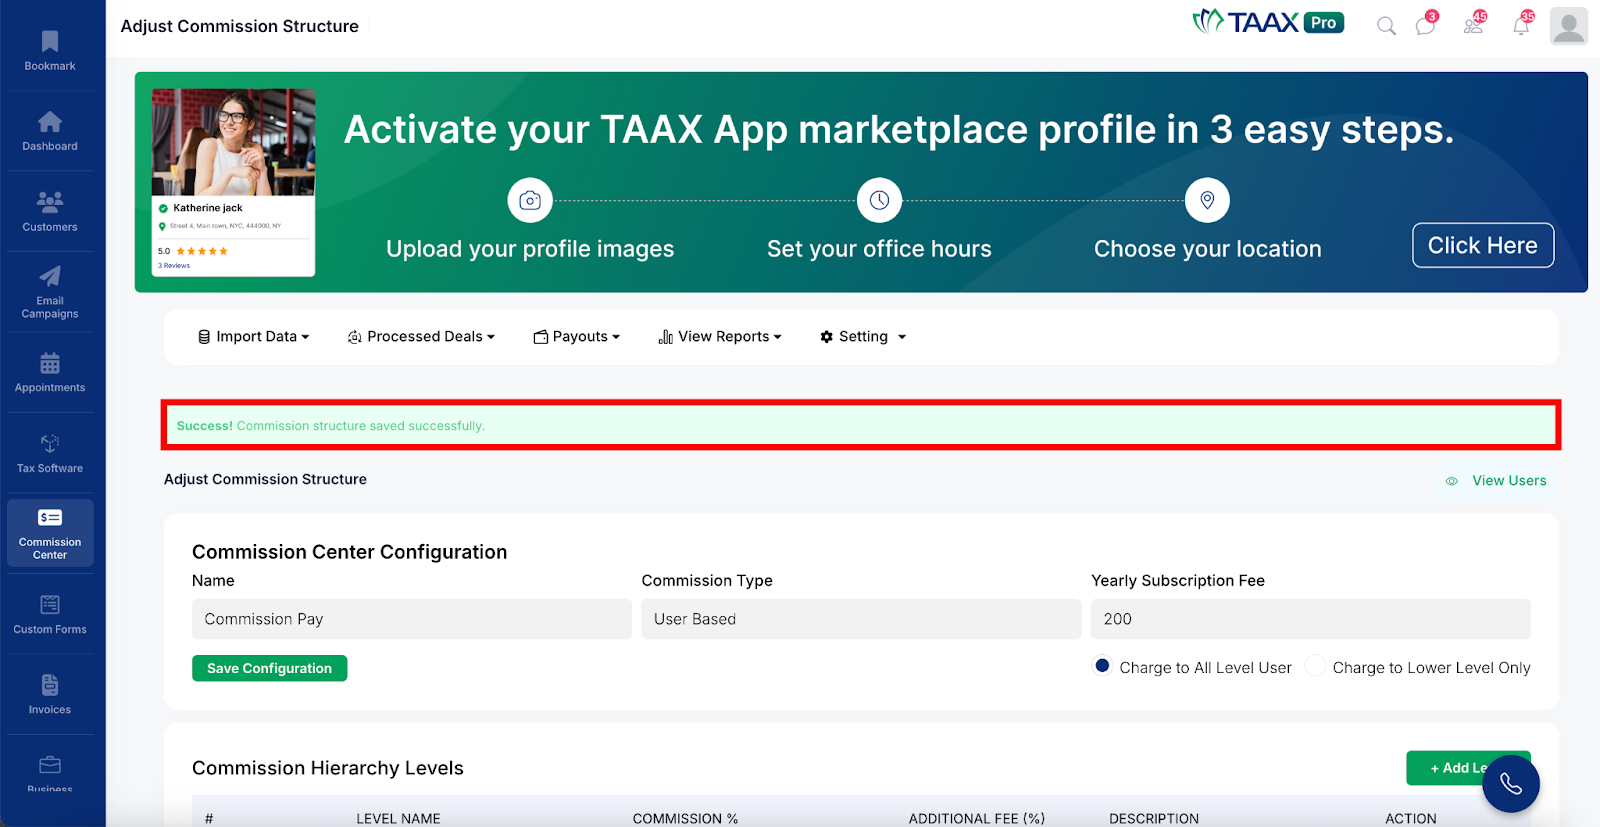
Step 8: Once all changes have been made, click the Save Changes button to save the updated commission hierarchy. A success message will appear on the page confirming that the commission structure has been saved successfully.
View Users Detail
The Users Detail section provides a complete overview of all users that have been added to the commission hierarchy. From this page, users can search for specific members, view their individual details, remove them from the hierarchy, or delete them from the Commission Center entirely.
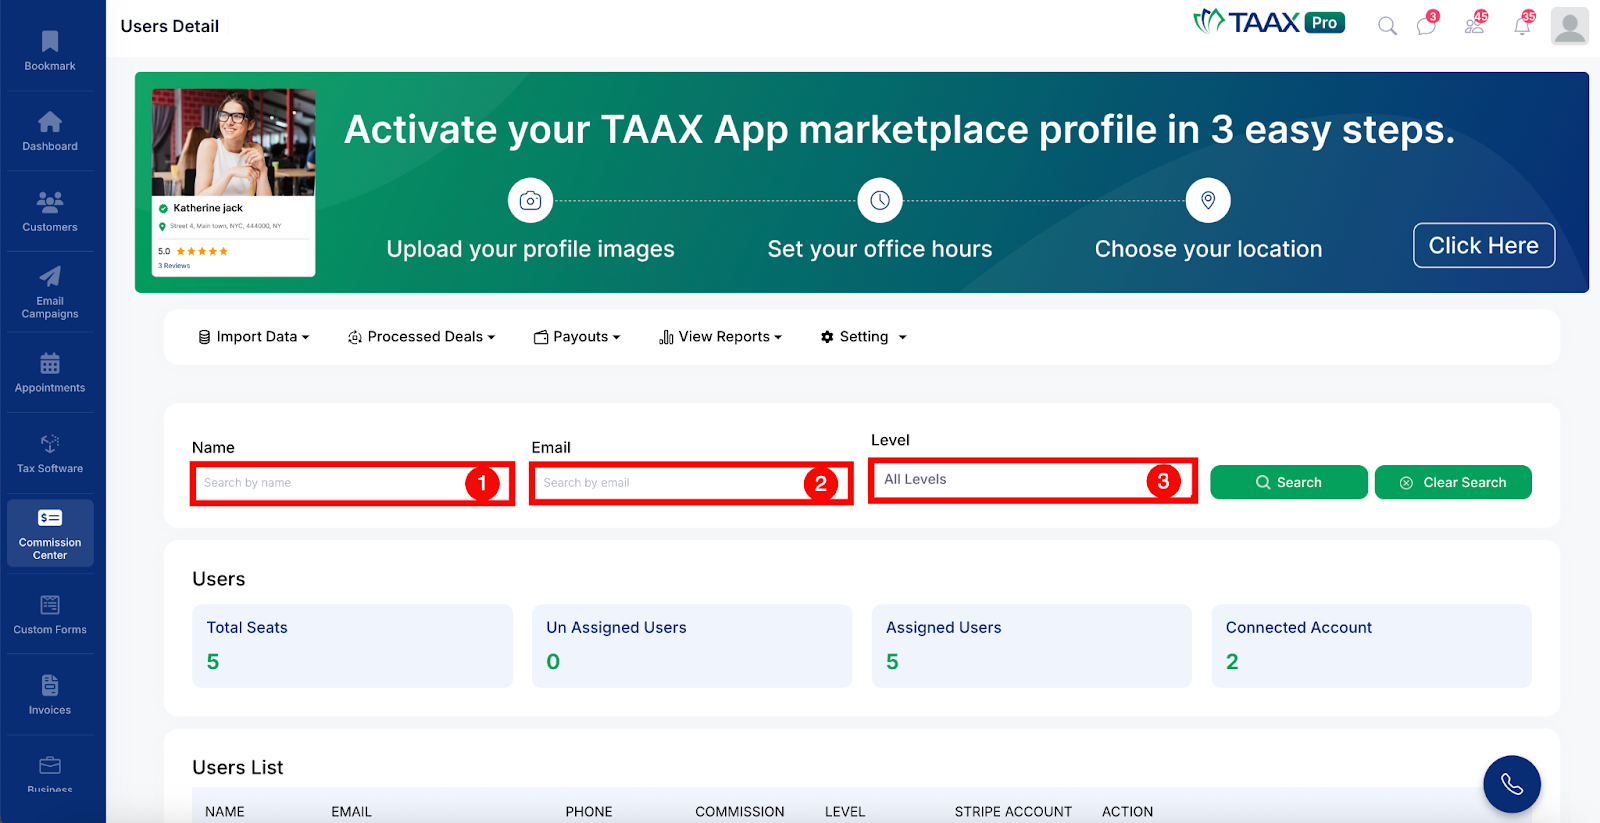
Step 1: Navigate to Setting and click Users Detail to open the Users Detail page.
Step 2: Use the available filters to search for specific users:
- Name – Enter the name of the user you want to find.
- Email – Enter the email address of the user to search by email.
- Level – Select a hierarchy level from the dropdown to filter users by their assigned level.
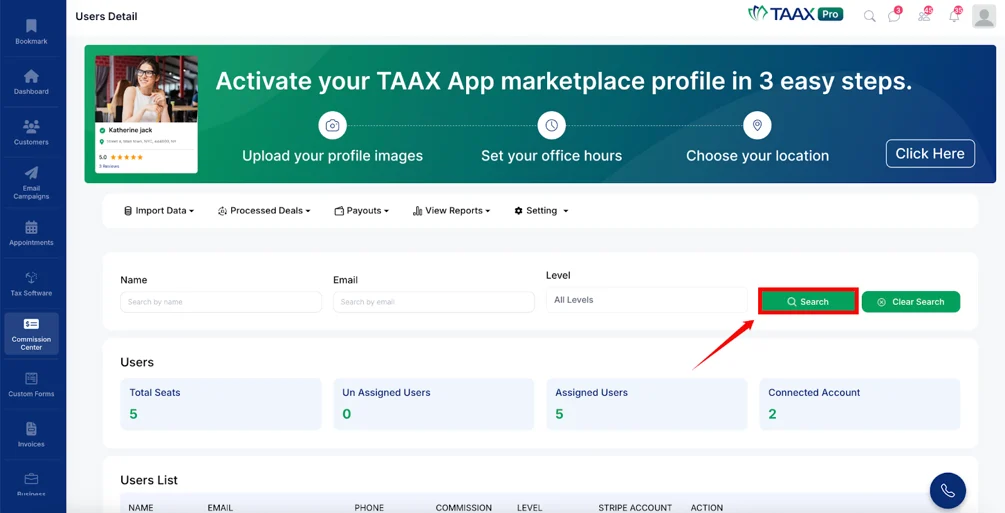
Step 3: Click the Search button to apply the selected filters and display the matching users.
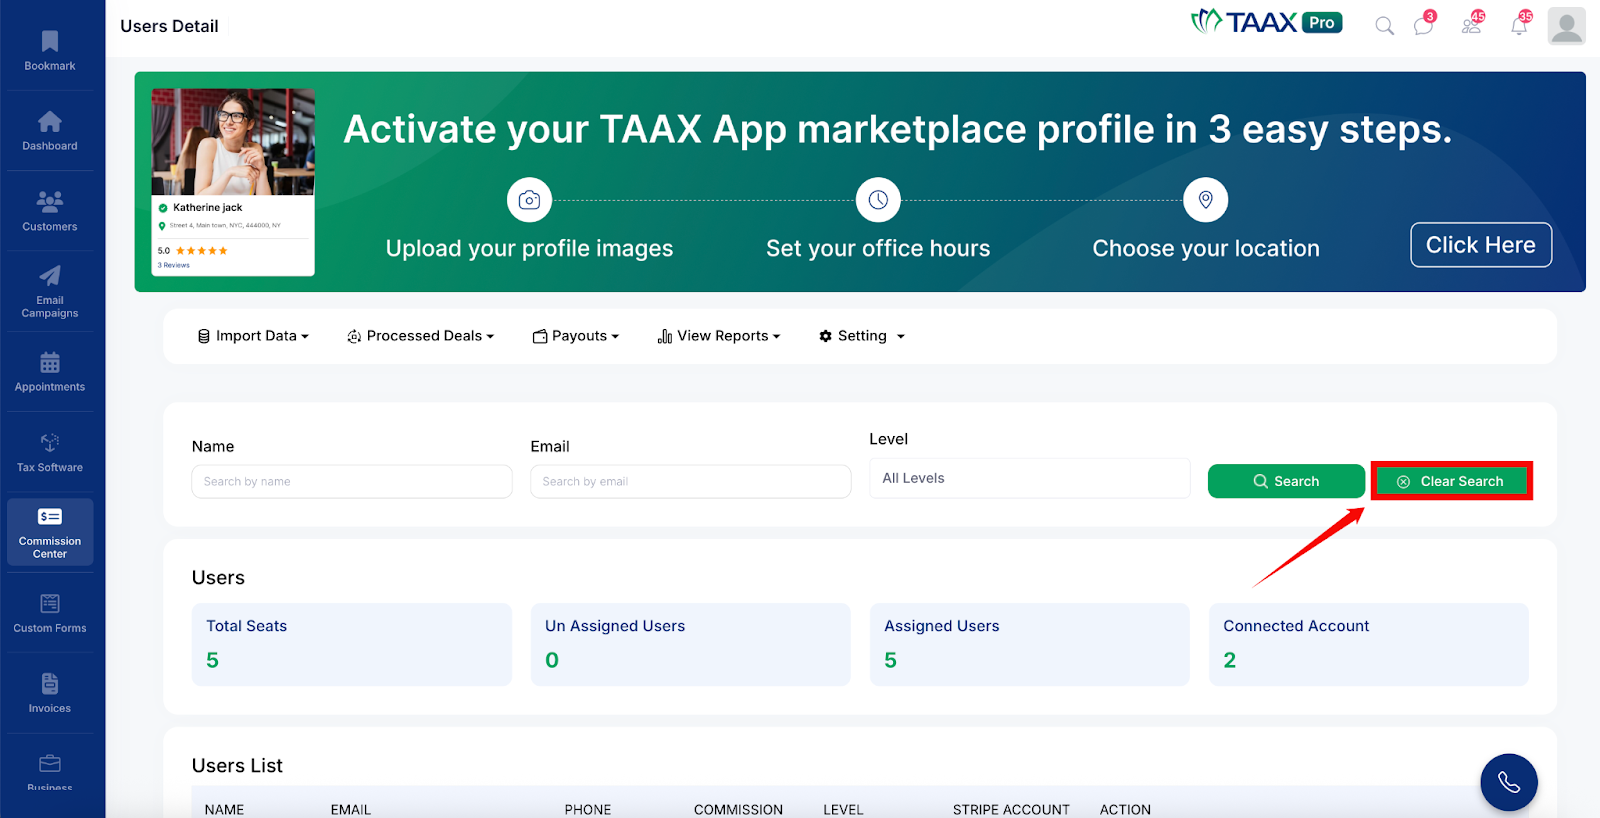
Step 4: Click Clear Search to remove all filters and return to the full list of users.
Step 5: Review the user summary displayed at the top of the Users section, which provides a quick overview of the following:
- Total Seats – The total number of seats available in the commission hierarchy.
- Unassigned Users – The number of users who have not yet been assigned to a hierarchy level.
- Assigned Users – The number of users who are currently assigned to a hierarchy level.
- Connected Account – The number of users who have a connected Stripe account.
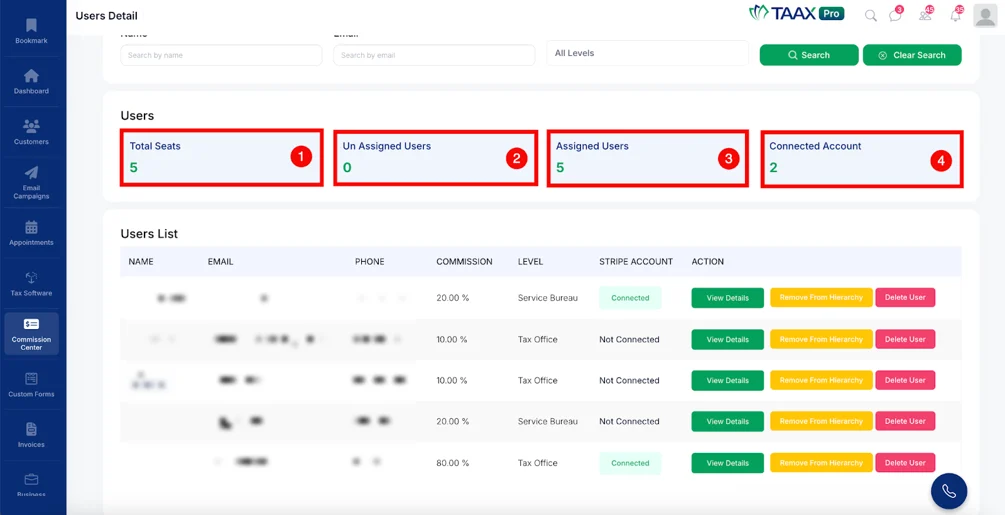
Step 6: Review the Users List table below the summary. This table displays each user’s Name, Email, Phone, Commission percentage, Level, Stripe Account connection status, and available action buttons.
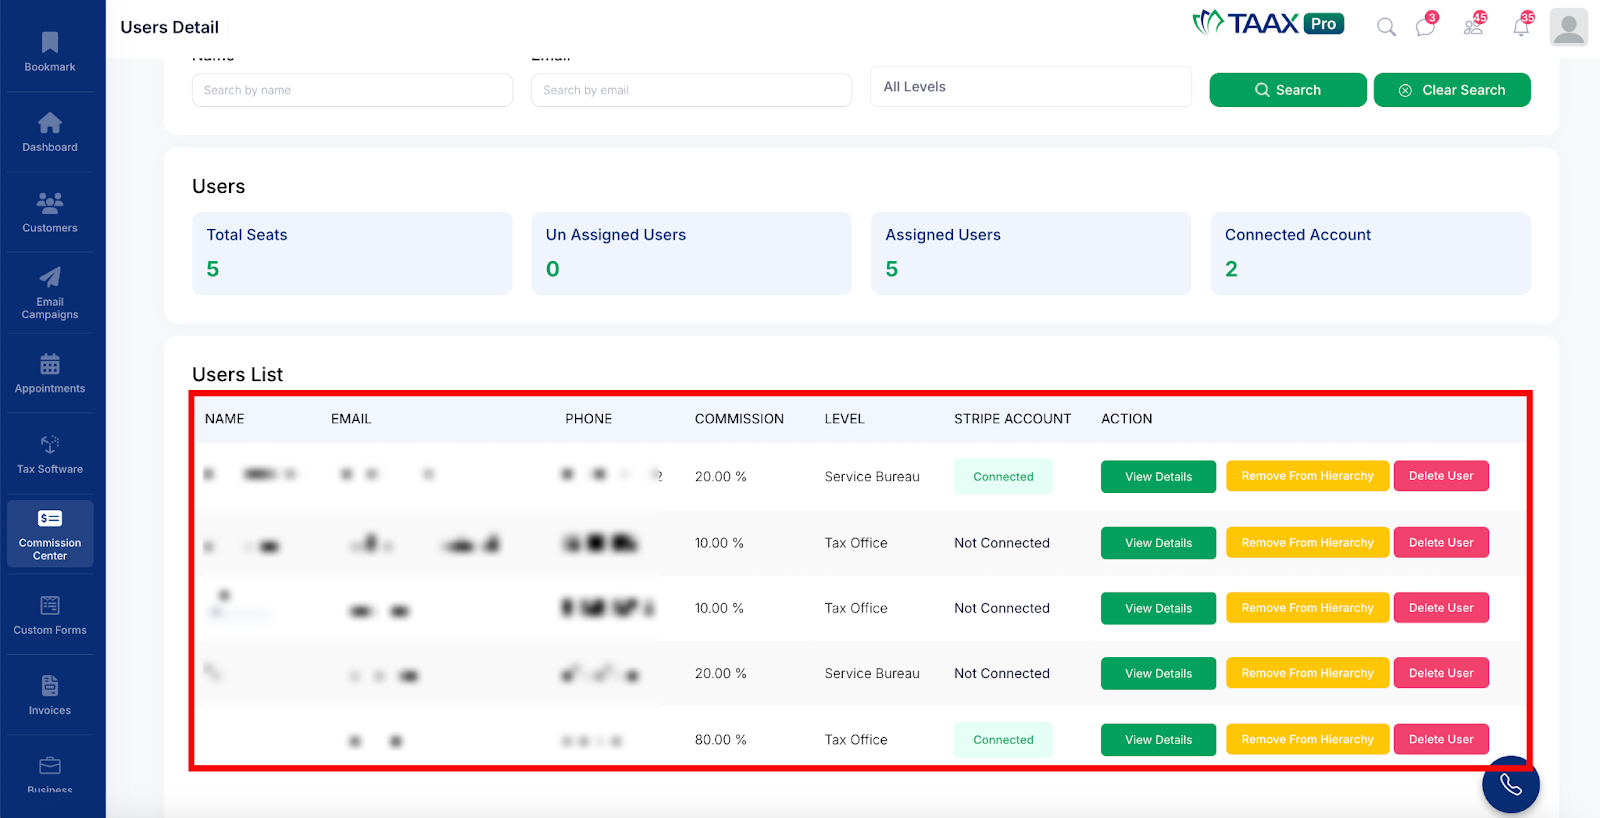
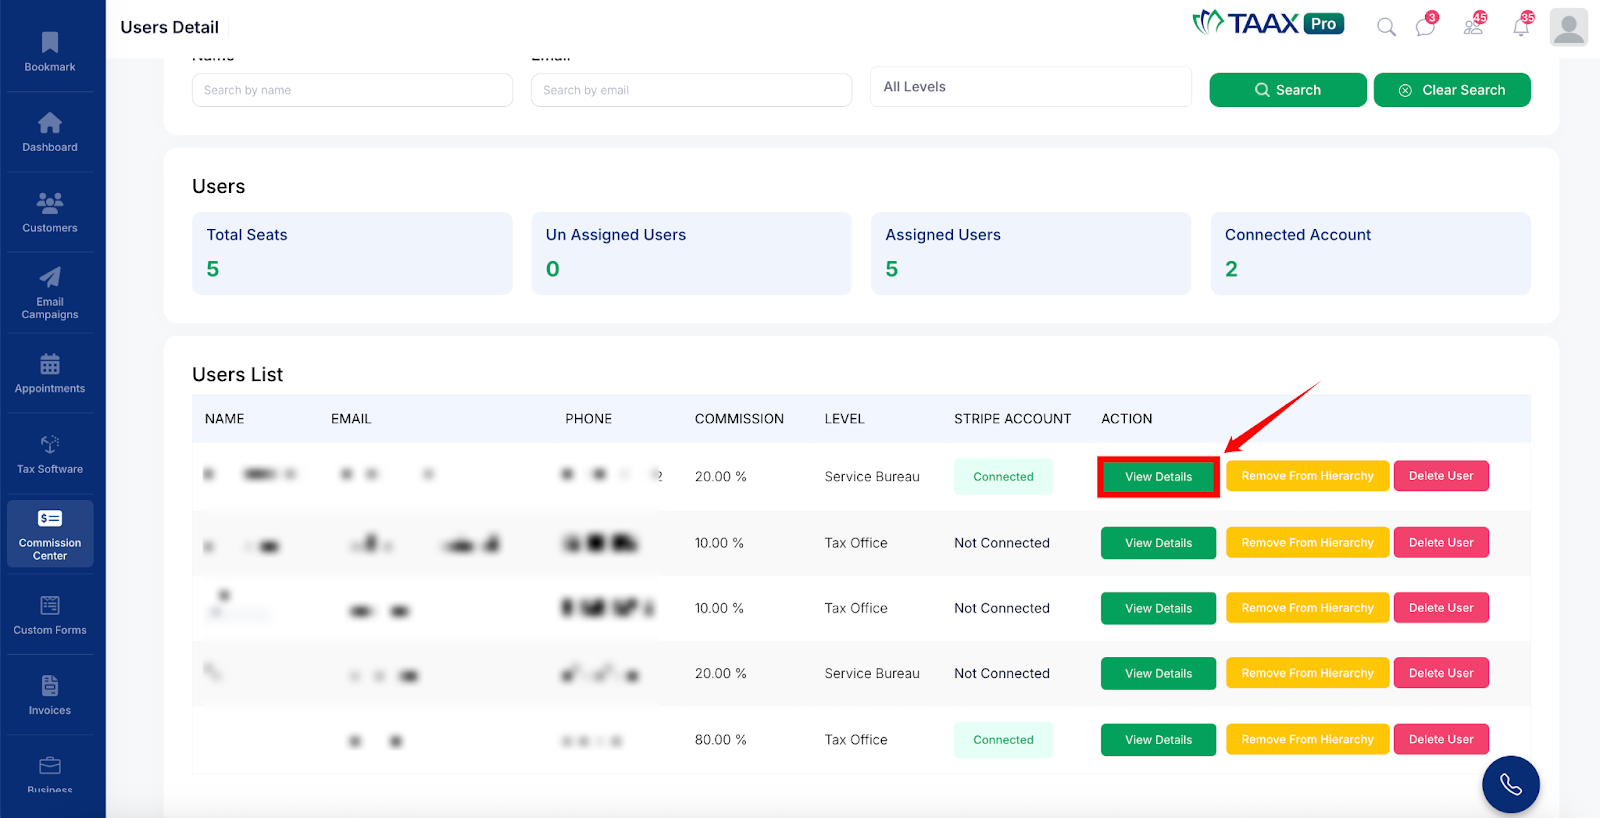
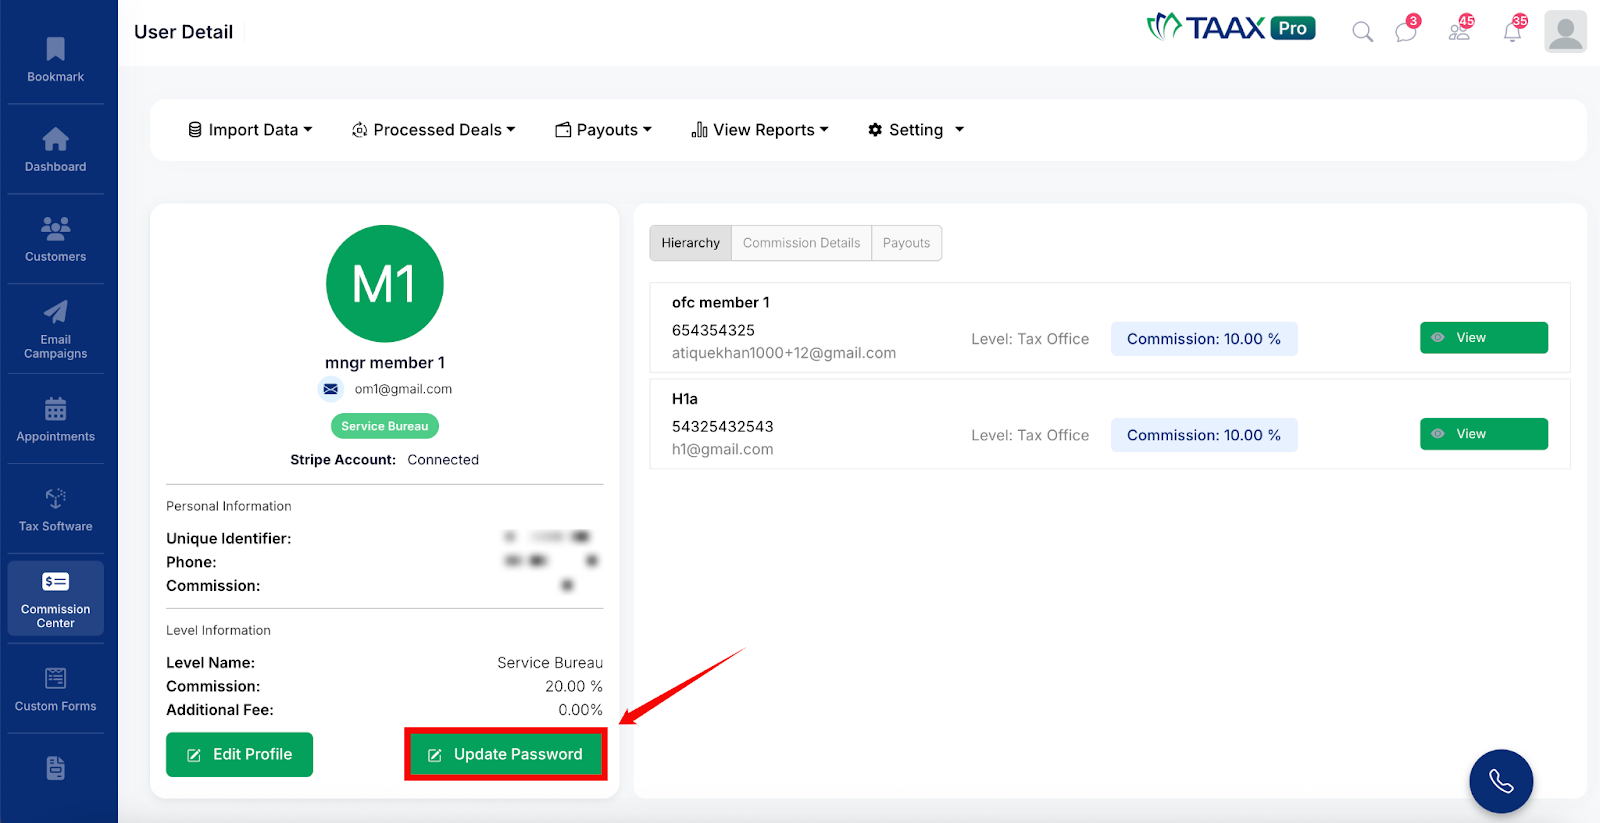
View Details
To view the full details of a specific user, click the View Details button in the Actions column next to that user. The User Detail page will open.
Click Edit Profile to update the user’s profile information.
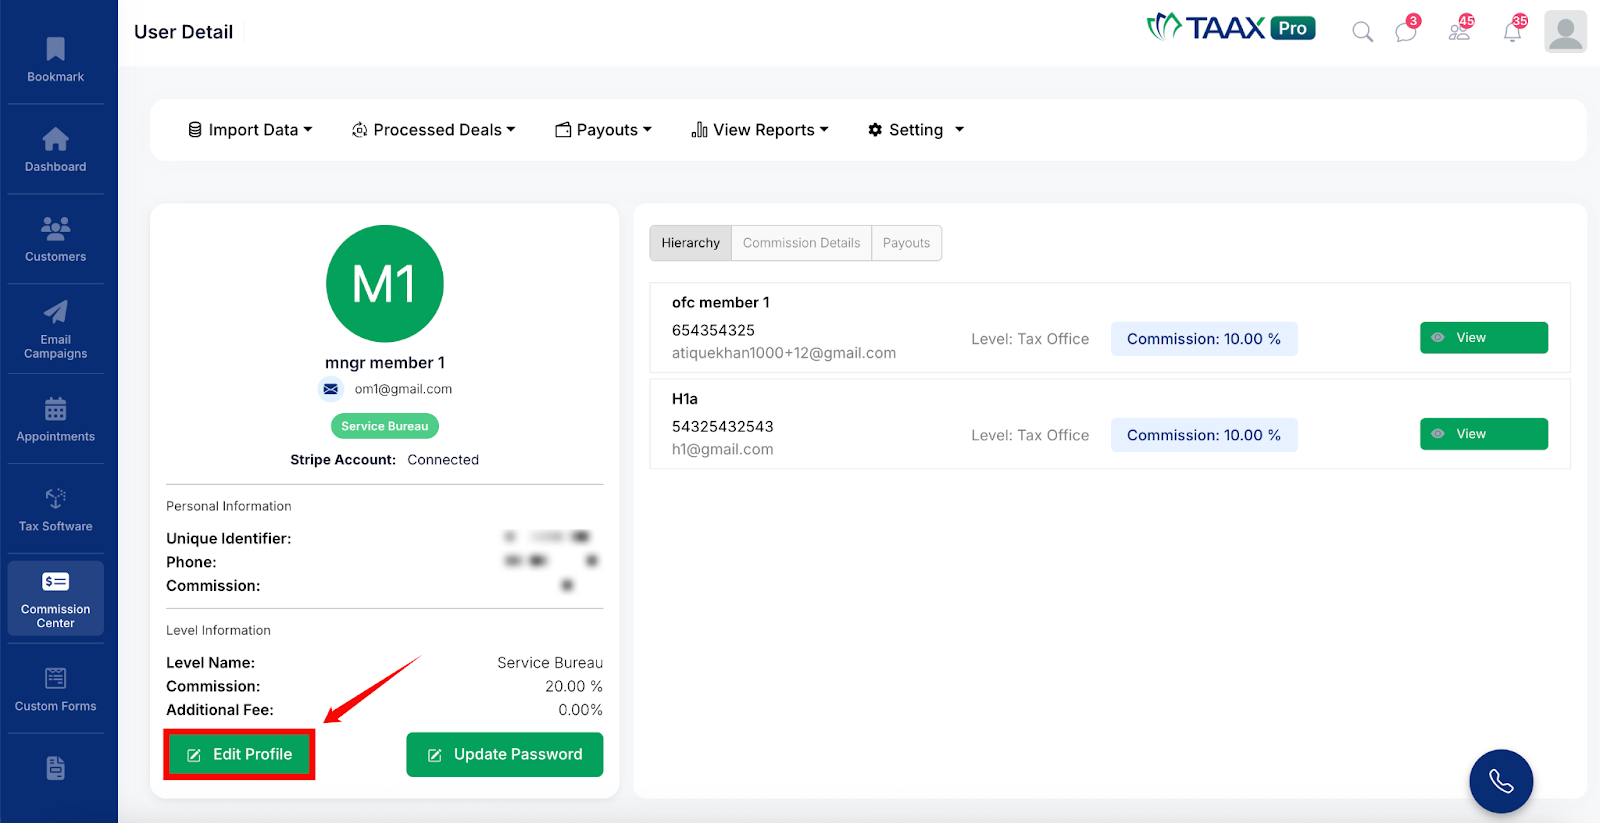
Click Update Password to change the user’s password.
Remove User From Hierarchy
To remove a user from the hierarchy without deleting them from the system, click the Remove From Hierarchy button next to the user in the Users List.

A dialog box titled Remove user from hierarchy will appear. Select a new lead user from the dropdown to reassign the user’s subordinates, then click Save Changes to confirm.

Delete User
To permanently delete a user from the Commission Center, click the Delete User button next to the user.
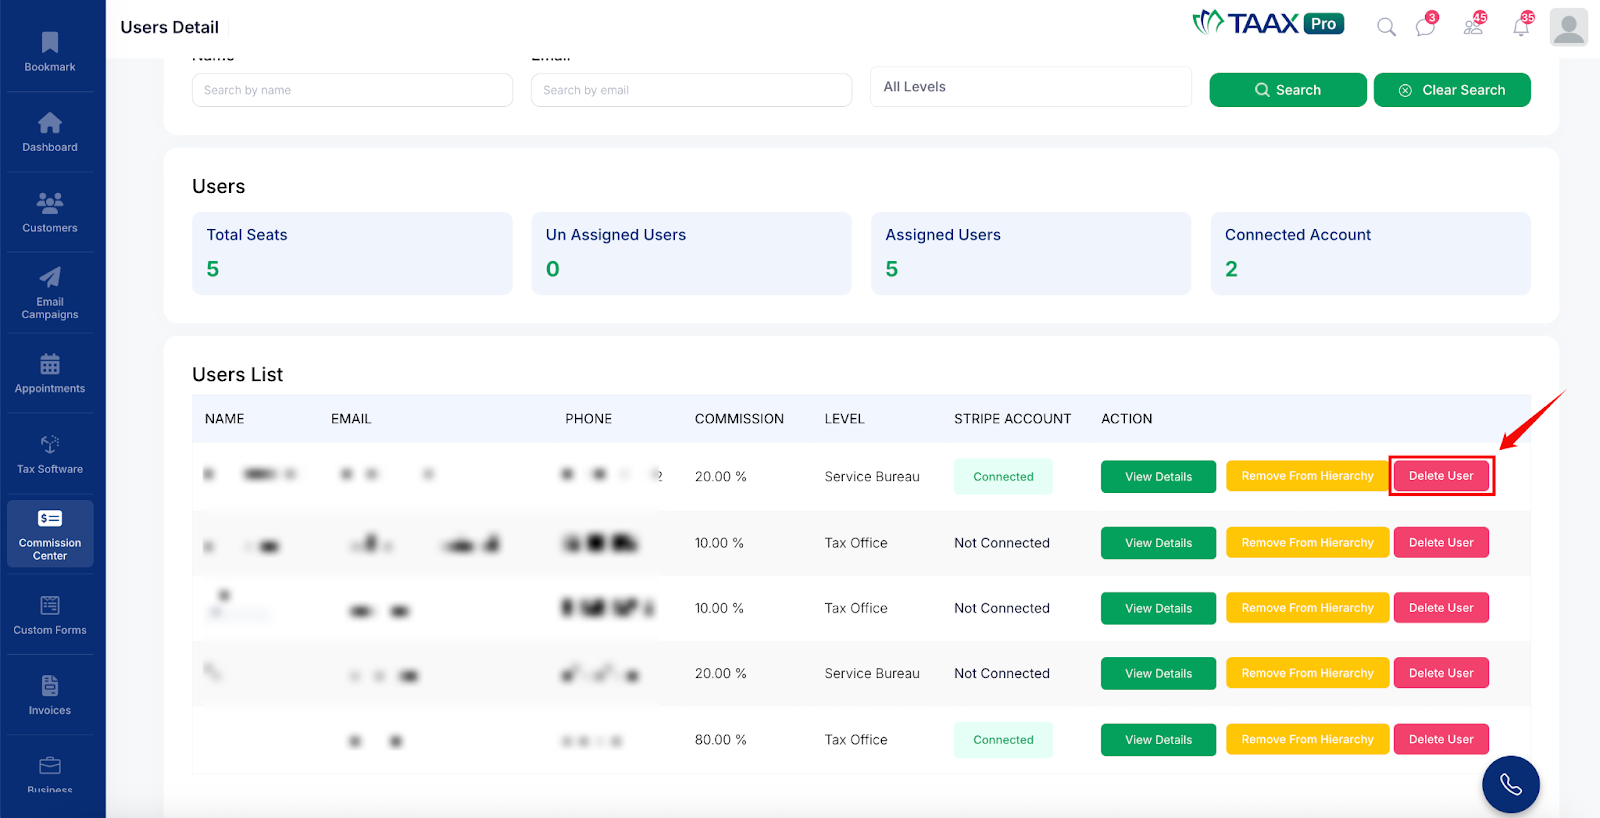
A dialog box titled Delete User From Commission Center will appear. Select a new lead user from the dropdown to reassign the deleted user’s subordinates, then click Save Changes to confirm the deletion.

Users Add
The Users Add section allows users to add new members to the commission hierarchy. New users can be added as a brand new user, an existing business user, or an unassigned user who is already in the system but has not yet been assigned to a hierarchy level.
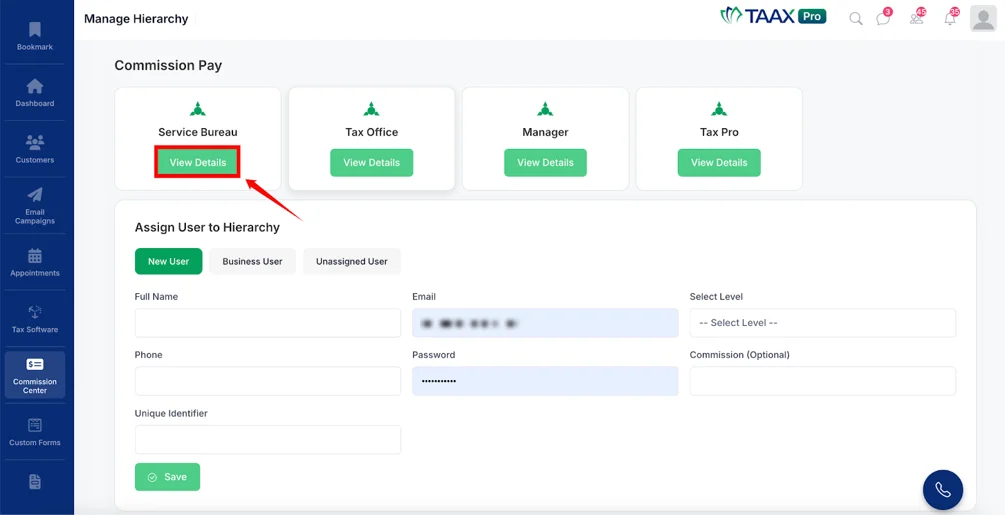
Step 1: Navigate to Setting and click Users Add to open the Manage Hierarchy page.
Step 2: At the top of the page, the commission hierarchy levels are displayed as cards showing each level name (e.g., Service Bureau, Tax Office, Manager, Tax Pro).
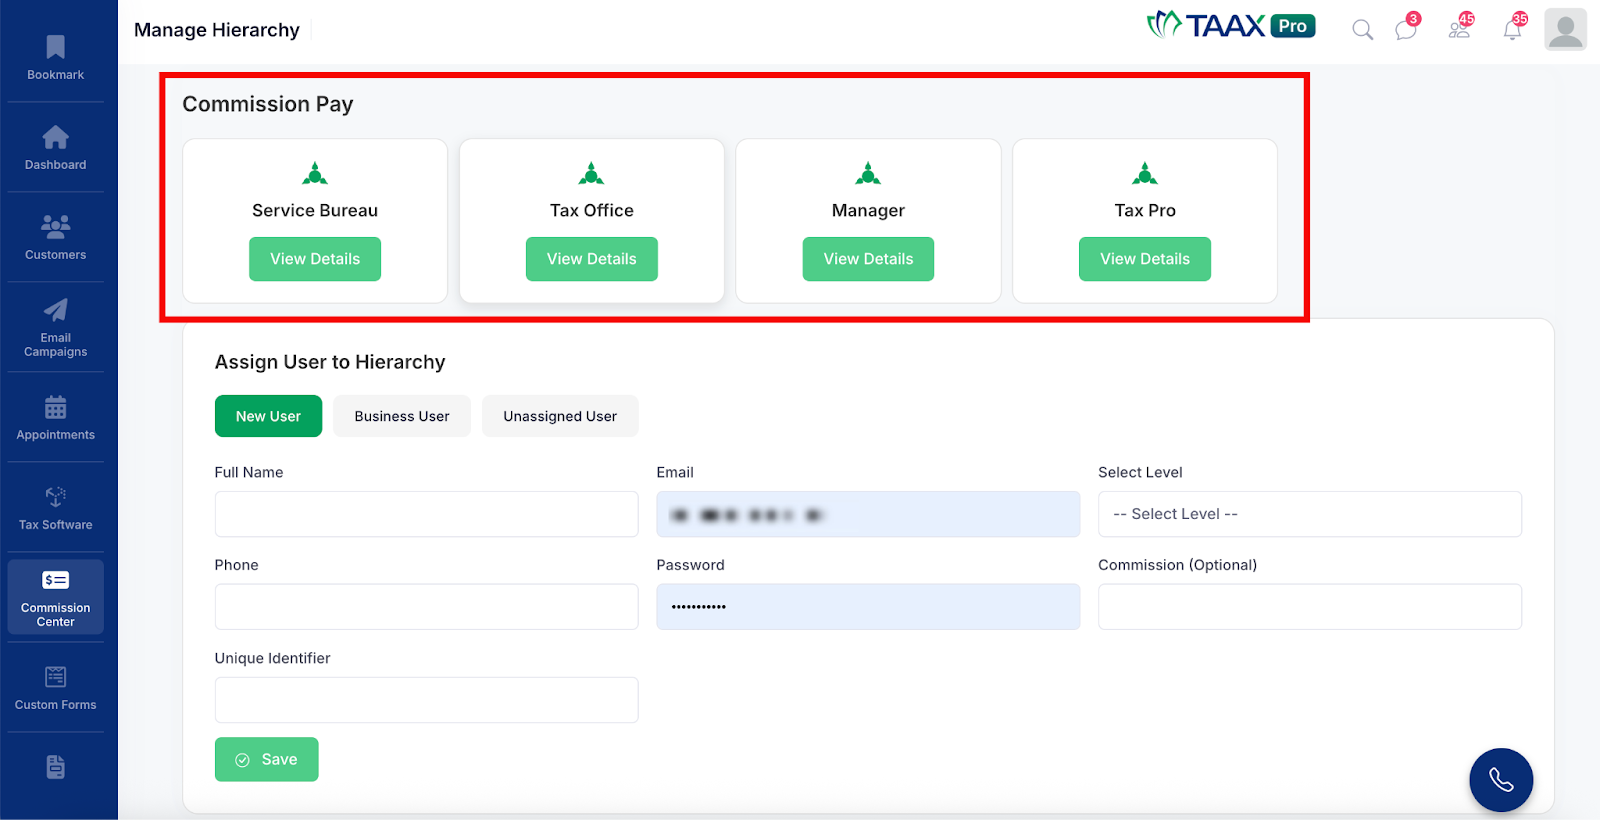
Step 3: Click the View Details button under any level to see the list of users currently assigned to that level.
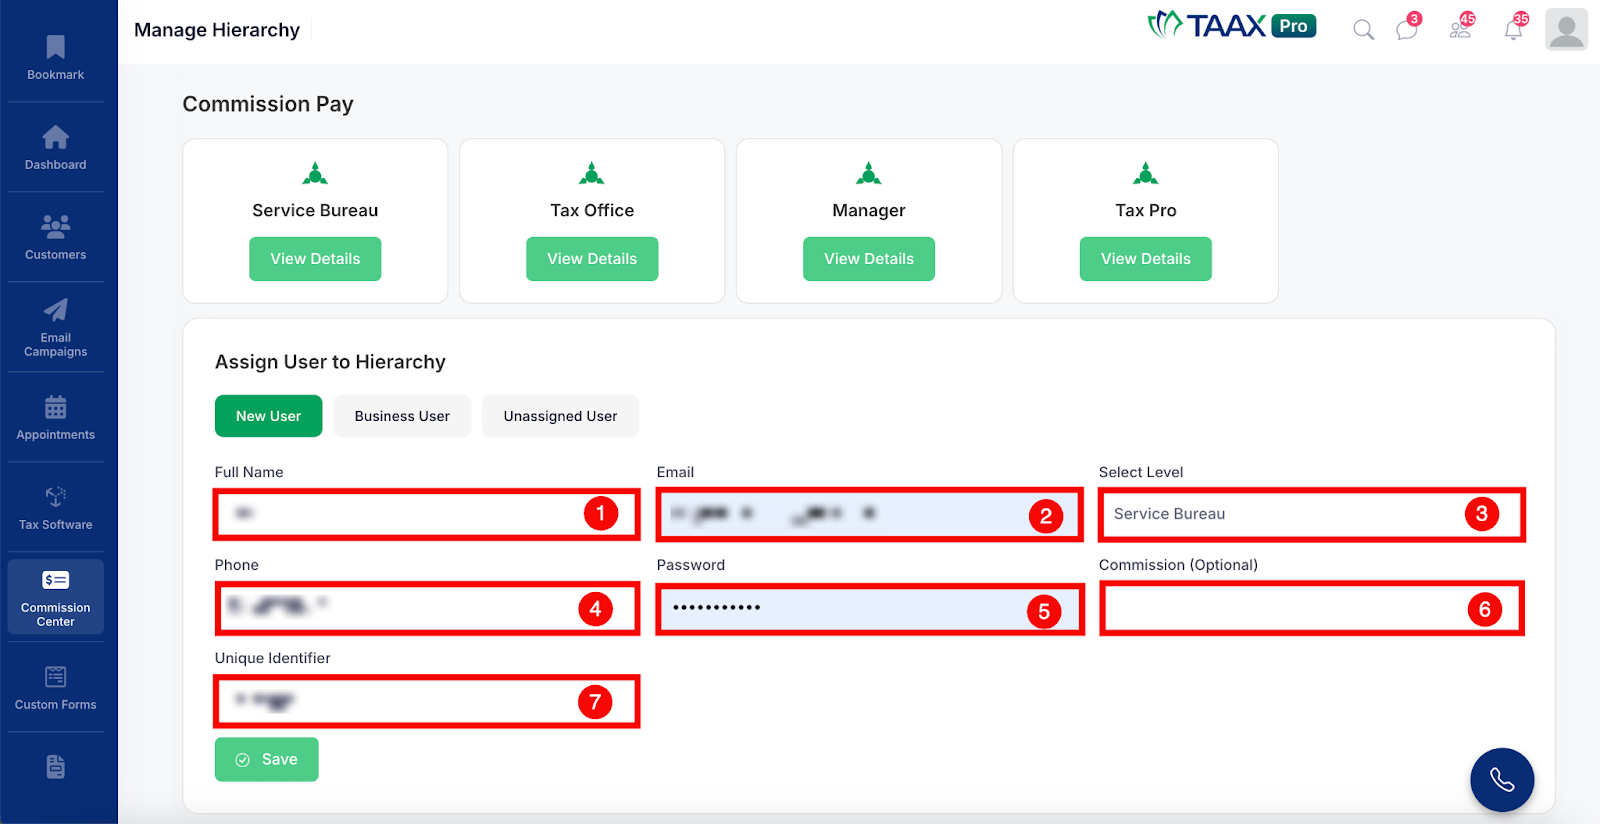
Assign User to Hierarchy
Step 1: In the Assign User to Hierarchy section, select the type of user you want to add by clicking one of the following tabs:
- New User – Use this option to create a brand new user account and add them directly to the hierarchy.
- Business User – Use this option to add an existing business user who already has an account in the system.
- Unassigned User – Use this option to assign a user who is already in the system but has not been assigned to any hierarchy level yet.

Step 4: Fill in the required details in the form:
| Ref. | Field | Description |
| 1 | Full Name | Enter the full name of the user. |
| 2 | Enter the email address of the user. This will be used for login and communication. | |
| 3 | Select Level | Select the hierarchy level to assign to this user, such as Service Bureau, Tax Office, Manager, or Tax Pro. |
| 4 | Phone | Enter the phone number of the user. |
| 5 | Password | Enter a password for the user’s account. |
| 6 | Commission (Optional) | If you want to assign a custom commission percentage to this user that is different from the default level commission, enter it here. |
| 7 | Unique Identifier | Enter a unique identifier for the user, such as an office ID or member code. |
Step 5: Once all the required details have been entered, click the Save button to add the user to the commission hierarchy.
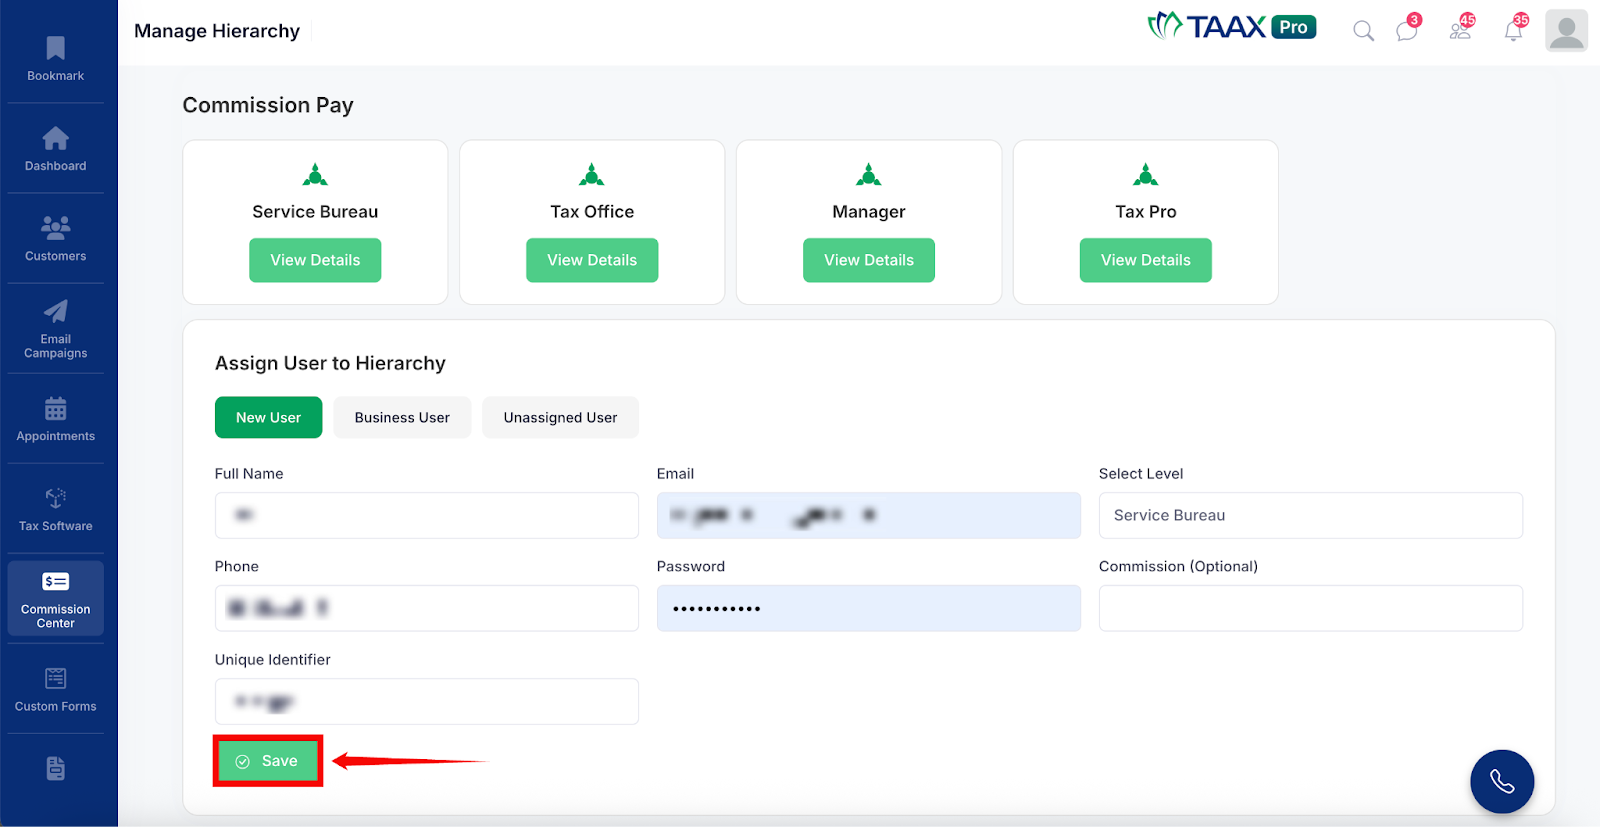
The user will then appear in the Users Detail page under their assigned hierarchy level.