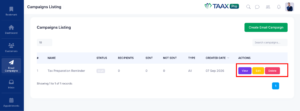
The Email Campaigns feature in TAAX Pro allows you to create and manage email campaigns for your customers. You can configure a campaign by selecting the campaign type, sending email account, audience, email template, and delivery timing. Once a campaign is configured, you can save it as a draft, send it immediately, or schedule it for later.
From the Campaigns workspace, you can also view existing campaigns, search for a specific campaign, and review campaign information such as recipients, sent emails, emails that were not sent, campaign type, status, and creation date.
Create an Email Campaign
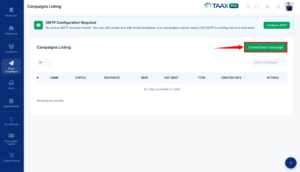
Before creating a campaign, make sure the required email sending configuration is available. An active SMTP configuration is required to send campaign emails.
Step 1: Log in to your TAAX Pro account and navigate to Email Campaigns and select Campaigns from the left sidebar.
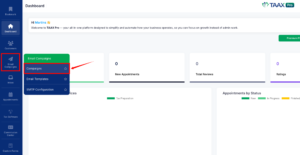
Step 2: On the Campaigns page, click Create Email Campaign to start creating a new campaign.
Step 3: On the Create Campaign page, enter the required campaign details.
| Ref. | Field | Description |
| 1 | Campaign Name | Enter a name that identifies the purpose of the campaign. |
| 2 | Campaign Type | Select the type of campaign you want to create. |
| 3 | Sending Email Account | Select the email account that will be used to send the campaign. |
| 4 | Audience | Select the customers who should receive the campaign. |
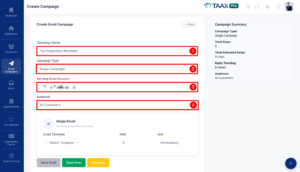
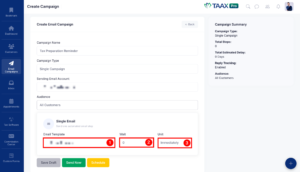
Step 4: Under the Single Email section, configure the email that will be sent as part of the campaign.
| Ref. | Field | Description |
| 1 | Email Template | Select the email template that contains the content you want to send to the selected audience. |
| 2 | Wait | Enter the amount of time to wait before the email step is executed. |
| 3 | Unit | Select how the wait value should be applied. |
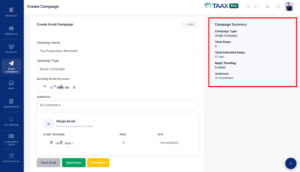
Step 5: Review the Campaign Summary displayed on the right side of the page. The summary provides an overview of the campaign, including the Campaign Type, Total Steps, Total Estimated Delay, Reply Tracking, and Audience.
Step 6: If you want to send the campaign later, click on the Schedule button and choose a future date and time. TAAX Pro will begin sending emails at the selected schedule.
Note: The schedule must be set to a future date and time. Otherwise, TAAX Pro displays: Please select a future date and time.
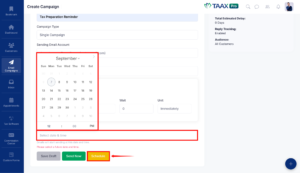
Step 7: After reviewing the campaign details, choose one of the available actions:
- Save Draft: Saves the campaign without sending it.
- Send Now: Sends the campaign immediately.
- Schedule: Allows the campaign to be sent at a later time.
Manage Campaigns
Once campaigns have been created, you can manage them from the Campaigns workspace.
Step 1: Navigate to Email Campaigns and select Campaigns from the TAAX Pro left sidebar.
Step 2: From the Campaigns Listing page, locate the campaign you want to manage. The table displays campaign details such as the Name, Status, Recipients, Sent, Not Sent, Type, and Created Date.
| Column | Description |
| # | Displays the campaign number in the list. |
| Name | Displays the name of the campaign. |
| Status | Displays the current status of the campaign. |
| Recipients | Displays the number of recipients included in the campaign. |
| Sent | Displays the number of emails that have been sent. |
| Not Sent | Displays the number of emails that were not sent. |
| Type | Displays the campaign type. |
| Created Date | Displays when the campaign was created. |
| Actions | Provides available actions for the campaign. |
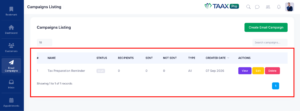
Step 3: To find a specific campaign, enter the campaign name or relevant search term in the Search campaigns… field. TAAX Pro filters the campaign list and displays the matching results.
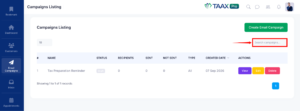
Step 4: Under the Actions column, choose the action you want to perform for the campaign:
- View: Opens the campaign to review its details.
- Edit: Opens the campaign so you can update its configuration.
- Delete: Removes the campaign from the campaign list.